Tuesday, December 29, 2009

How to Convert iTunes 9 Music to MP3

Are you annoyed by iTunes DRM? Do you want to remove it because you want to play the iTunes music on non-Apple MP3 players like PSP, Zune, Creative Zen, BlackBerry, PS3, iriver, Walkman, mobile phone MP3 player, etc, use it as background music in a home video, or anything else that DRM limits it to do? You got the right place!

The following article is going to show you how to convert DRM protected iTunes M4P to MP3, AAC to MP3, M4A to MP3 with TuneClone Audio Converter and iTunes 9.0.2 so that you can play iTunes music on any MP3/MP4 player or mobile phone music player.

Step 1. Download TuneClone Audio Converter and install it

TuneClone Audio Converter is compatible with Windows XP, Windows Vista (except Vista 64 bit) and Intel based Mac OS X 10.5 -10.6.

Step 2. Make settings in TuneClone Audio Converter

Convert iTunes 9 music to mp3

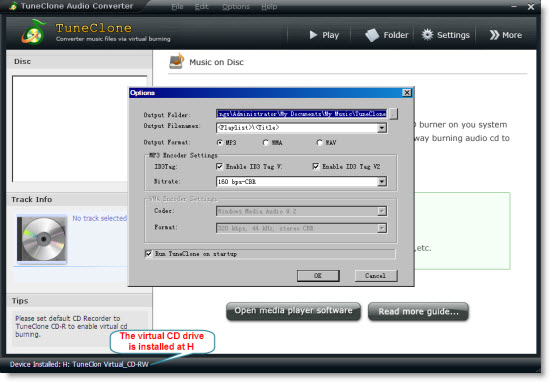
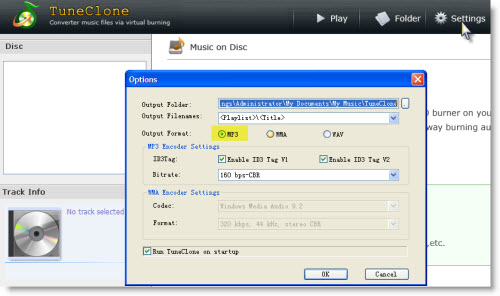
Click the "Settings" button in TuneClone. In the pop-up dialog, you can specify the "output folder", "output filenames", "output format", etc for the output files.

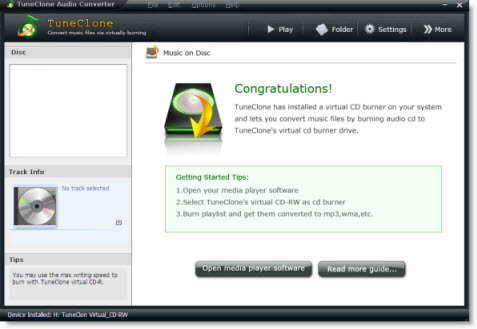
Note: A Virtual CD Drive will be installed to convert iTunes music files. You must make sure this CD burner is successfully installed. you can check whether it is successfully installed and where it is installed at the bottom left corner of TuneClone interface.

Step 3. Create a playlist in iTunes 9

Create a new playlist, and add the iTunes songs you want to convert to the playlist.

Step 4. Make burning settings in iTunes 9

Right click the playlist you just created and choose "Burn Playlist to Disc".

Or you can select part of songs from the playlist and click the "Burn Disc" at the bottom right corner of iTunes interface.

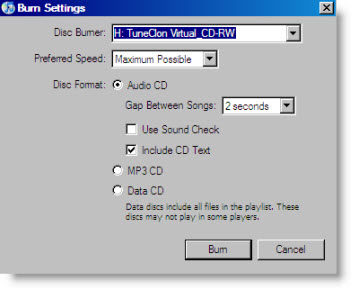
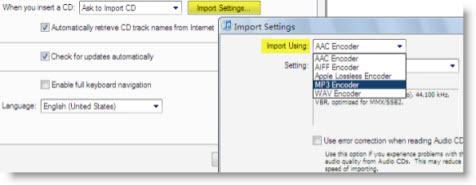
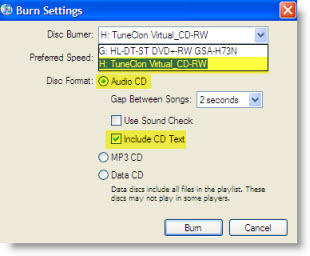
In the pop-up dialog of "Burn Settings", make the settings as highlighted below:

Convert iTunes 9 music to mp3

Note: You need to tick the "Include CD Text" option to perserve the music metadata such as name, artist, album names.

Step 5. Start to burn

Click the "Burn" button to start burning.

After the burning gets started, TuneClone Audio Converter will automatically convert the iTunes music to MP3 files.

Convert iTunes 9 music to mp3

You can open the manager screen to show all the converted music files.

Tip: The most important step is to choose the CD burner. Then TuneClone Audio Converter will convert the music files automatically. It is exceedingly easy when you want to batch convert lots of files.

How to import DVD movies clips into Apple iMovie

If you are fond of some video clip from a DVD movie and want to edit it in Apple iMovie project, you got the right place! The following tutorial will share with you how to convert DVD to iMovie friendly video format and import DVD into iMovie for editing.

Video formats accepted by iMovie include MPEG-2 and AVCHD, DV-Standard and HDV (High Definition Video), QuickTime Movie, MEPG-4. In order to import DVD movie into iMovie, you need to convert DVD to iMovie compatible format first. It is very easy and fast to convert DVD to iMovie format using Clone2Go DVD Ripper for Mac.

Step 1. Add DVD Movie

Download the latest version of Clone2Go DVD Ripper for Mac, install and run it. ( Free Download )

Click the "Open DVD" button to import your DVD movie. Or you can click the "File ->Open DVD Disc/Folder" in the top menu of Clone2Go DVD Ripper for Mac to add the DVD movie.

Convert DVD to iMovie

Step 2. Select output format: "MPEG-4 Movie (*mp4)"

After the DVD is imported, go to the "Output" panel. Click the "Profile" drop-down list to choose "MPEG-4 Movie (*mp4)" as the output format.


Convert DVD to iMovie


Step 3. Start converting

When all settings are done, click the "Convert Now" button to start convert DVD to iMovie format.

Step 4. Export the output file to iMovie

Launch iMovie, go to "File > Import > Movies...". Select the converted MP4 video then click "Import".

Convert DVD to iMovie

That's it! Now you can edit your videos in iMovie. Enjoy making your own movies!

Tuesday, December 08, 2009

Clone2Go intros Mac DVD Ripper & Video Converter v1.0.1

Clone2Go DVD Ripper for Mac is all-in-one Mac DVD ripping and video conversion software specially designed for Mac OS X users.


This all-in-one Mac DVD and video converter can rip DVDs to a variety of formats, including iTunes-, iPod-, iPhone-, and Apple TV-compatible MP4, AVI, FLV, MOV, 3GP, and also offers video conversion for a host of formats and audio extraction from DVD and video files in MP3, M4A, AAC or WAV format.


With this powerful Mac DVD Ripper, you can trim video length, choose DVD audio track and subtitle, customize output profile, etc to meet your specific needs.


Clone2Go DVD Ripper for Mac


Key features of Clone2Go DVD Ripper & Video Converter for Mac


1. Rip DVD to a variety of video formats

This DVD Ripper for Mac can rip DVD to a variety of video formats, including iTunes-, iPod-, iPhone-, and Apple TV-compatible MP4, H.264, AVI, FLV, MOV, 3GP, WMV, etc.


2. Convert between a host of video formats

The Mac Video Converter can convert video files in various formats such as AVI, WMV, MOV, MP4, 3GP, M4V, QT, RM, RMVB, FLV, MKV, etc


3. Extract audio from DVD and video files

Allow you to extract audio from DVD and video files in MP2, MP3, OGG, WAV, M4A, AAC or AMR format.


4. Rip DVD for all popular portable players

This Mac DVD Ripper offers optimized settings for all popular portable players including Apple iPod touch, iPod classic, iPod nano, iPhone 3G, iPhone 3GS, Apple TV, PSP, PS3, Creative Zen, Archos, iRiver, cell phones and other digital video and audio players


5. Trim DVD/video clips

You can trim DVD movie or video file to get video or audio clips and just rip certain segment you need.


6. Customize an output profile

You can customize the video/audio parameters such as video bitrate, size, frame rize, audio bitrate, sample rate, etc and save it as an output profile for further use.


7. Select DVD audio track and subtitle

Allow you to select any available DVD audio track and subtitle you prefer


8. Batch select video files for conversion


9. Preview the DVD or video files


Availability and Price


Clone2Go DVD Ripper & Video Converter for Mac v1.0.1 is available at http://www.clone2go.com/products/mac-dvd-ripper-video-converter.php. You can free download it directly via this link http://www.clone2go.com/down/clone2go-dvd-ripper-mac-intel.dmg. Clone2Go DVD Ripper & Video Converter for Mac costs USD39.95 to register. You can know about other Clone2Go products from http://www.clone2go.com

Wednesday, October 21, 2009

How to Convert M4A to MP3 on Mac?

Below is step by step guide that shows you how to convert iTunes M4A to MP3 on Mac OS X with TuneClone Audio Converter for Mac.


Step 1. Download TuneClone Audio Converter for Mac from http://mac.tuneclone.com and run it.


Note: During the startup, a virtual CD burner will be installed, which will be used to convert iTunes music files.


Step 2. Make settings in TuneClone Audio Converter for Mac


Go to top-left "TuneClone -> Preferences..." a window will appear as below:


tuneclone-preference.png


Step 3. Make settings in iTunes (iTunes 9.0.1)


Create a new playlist and add the songs you are going to convert.


Right click the playlist you just created and choose "Burn Playlist to Disc". Or you can click the "Burn Disc" button at the bottom right corner of iTunes interface.


In the pop-up dialog of "Burn Settings", you can make settings as highlighted below:


burn-settings.png


Note: You need to tick the "Include CD Text" option to perserve the music metadata such as name, artist, album names.


Step 4. Start to burn


Click the "Burn" button to start burning. After the burning get started, TuneClone will automatically convert the iTunes music to MP3 files. You can open the TuneClone manager screen to check out the burning status.


burning-status.png


Tip: You can easily get the output MP3 files on your Mac machine by clicking the "Reveal in Finder" button on the manager screen.


Note: The most important step is to choose the CD burner. Then the software can convert music files automatically. It is especially easy when you want to batch convert lots of files.


Extracted from http://mac.tuneclone.com/convert-m4a-to-mp3-on-mac.php

Convert iTunes M4P to MP3 on Mac

You have purchased lots of music from iTunes Store and want to play your music with other mobile devices, such as MP3 Player, MP4 Player, PSP, Mobile Phone? TuneClone Audio Converter for Mac comes to the rescue! It is the iTunes DRM Removal Software that can help you convert DRM protected iTunes M4P to MP3, M4A to MP3, AAC to MP3 on Apple Mac OS X (including Snow Leopard) with CD quality at high speed.


Below is step by step guide that shows you how to convert DRM protected iTunes M4P to MP3 on Mac OS X with TuneClone Audio Converter for Mac.


Step 1. Download TuneClone Audio Converter for Mac from http://mac.tuneclone.com/tuneclone-mac.dmg and run it.


Note: During the startup, a virtual CD burner will be installed, which will be used to convert iTunes music files. The administrator authorization will be needed to install TuneClone virtual CD burner.


Step 2. Open iTunes and burn playlist to TuneClone virtual CD writer


Create a new playlist and add the songs you are going to convert.


Right click the playlist you just created and choose "Burn Playlist to Disc". Or you can click the "Burn Disc" button at the bottom right corner of iTunes interface.


In the pop-up dialog of "Burn Settings", you can make settings as highlighted below:


burn-settings.png


Note: You need to tick the "Include CD Text" option to perserve the music metadata such as name, artist, album names.


Step 3. Start to burn


Click the "Burn" button to start burning. After the burning get started, TuneClone will automatically convert the iTunes music to MP3 files. You can open the TuneClone manager screen to check out the burning status.


burning-status.png


Tip: You can easily get the output MP3 files on your Mac machine by clicking the "Reveal in Finder" button on the manager screen.


Note: The most important step is to choose the CD burner. Then the software can convert music files automatically. It is especially easy when you want to batch convert lots of files.

Removing DRM from iTunes Music on Mac

The following article will share with you four ways of removing DRM protection from iTunes music on Mac OS X. You can choose your favorite method to help you convert iTunes M4P music to MP3 or (DRM free) AAC format for playback on MP3 Player, MP4 Player, Mobile Phone Player, etc.


Method 1. Remove DRM from iTunes music with burning-and-ripping method


1. Insert a CD-R or CD-RW disc into your CD-ROM drive


2. Run iTunes, create a new playlist and burn it to make an "Audio CD"


3. After the Audio CD is successfully burned, insert the disc into your CD-ROM drive again. Then you can use iTunes to import the music tracks on the burned disc as whatever format (MP3, AAC, etc) you selected in iTunes preferences for importing.


Method 2. Remove DRM from iTunes music with Virtual CD Burner


You will need to download TuneClone Audio Converter for Mac first. Run this DRM Removal Software and it will let you install a virtual CD burner, which will be used to convert iTunes music files.


Run iTunes, create a new playlist and add the DRM protected iTunes songs to the playlist.


Right click this playlist and choose "Burn Playlist to Disc". Alternatively, you can click the "Burn Disc" button at the lower right corner of iTunes interface.


In the pop-up dialog of "Burn Settings", select "CDWriter TuneClone" as default CD Burner, choose "Audio CD" as Disc Format and tick "Include CD Text" ( to perserve the music metadata such as name, artist, album names ).


Removing DRM from iTunes Music on Mac


Tip: You can easily get the output MP3 files on your Mac machine by clicking the "Reveal in Finder" button on the manager screen.


Method 3. Remove DRM from iTunes music with iMovie '09


Run iMovie and create a New Project. In the iMovie window, select the 'Music' tab. You will notice that the top right portion of the interface now offers a media browser. Locate the playlist which contains purchased music, or search by artist/title.


Remove DRM from iTunes Music on Mac


Select the DRM-laden song and drag the file from the media browser into the iMovie timeline.


In order to export the song, iMovie requires that a visual image be associated with the audio track - iMovie thinks that it is going to be exporting a movie. Simply drag a blank image (or any other image) to the track above the previously imported audio file. Once iMovie has processed the image, select the 'Export using QuickTime…' sub menu item from found inside 'Share' in iMovie's menu bar.


Remove DRM from iTunes Music on Mac


In the Save as… dialogue, select "Sound to AIFF" in the Export drop-down menu, Choose an appropriate directory for iMovie to export to, title the file, and select 'Save'.


Remove DRM from iTunes Music on Mac


Locate the exported AIFF audio file and drag to your iTunes Library. Right-click on the file and select "Create MP3 Version". Once completed, 'Get Info' on the new file, edit meta data, add album art, and trash the originally purchased and AIFF audio files from your iTunes library.


Method 4. Remove DRM from iTunes music with FairGame


FairGame is freeware to remove DRM protection from iTunes music on Mac OS X. It will convert the DRMed songs you bought on the iTunes Store to an unprotected format (using iTunes default encoder) and keep all the original metadata, lyrics and artwork. FairGame doesn't do lossless DRM stripping. It re-encodes protected AAC files purchased in iTMS into unprotected AAC file using Apple's iMovie software.


Remove DRM from iTunes Music on Mac


What you MUST DO (only once) to get FairGame to work:


enable "Access for assistive devices" in the "Universal Access" system preference


select "Place clip in Movie Timeline" in the "Import" preference of iMovie HD


Then you can simply:


select some songs in iTunes


click on the "Process songs" button


Don't touch anything and wait until it's done…(FairGame is scripting iMovie's interface to process the songs, don't interfere)

Tuesday, September 15, 2009

Transfer iTunes M4P to Zune HD

This guide is going to show you how to remove DRM protection from iTunes music, convert DRM protected iTunes M4P to MP3, M4A to MP3, AAC to MP3 and transfer iTunes music to Zune HD. First, let's take a look at the video/audio formats Zune HD accepts:

Video Support:
WMV
MPEG-4 (MP4/M4V) (.mp4) Part 2 video
H.264 video
DVR-MS

Audio Support:
Windows Media® Audio Standard (WMA) (.wma)
WMA Lossless
Advanced Audio Coding (AAC) (.mp4, .m4a, .m4b, .mov): .m4a and .m4b files without FairPlay DRM
MP3 (.mp3)

So, if you want to play DRM protected iTunes M4P, M4A, AAC music on your Zune HD, you just need to use TuneClone Audio Converter to convert the iTunes music to MP3 format and then transfer the output MP3 to your Zune HD.

Now let's take a look at how it performs to convert the iTunes music to MP3 format for Zune HD using TuneClone Audio Converter:

1. Create a new playlist in iTunes.

2. Add the iTunes songs to the playlist.

3. Launch TuneClone Audio Converter. Click the "Settings" tab. In the pop-up window, you can specify output folder, output file name format, output format, etc for the output files. Note: You can check whether TuneClone virtual CD drive is successfully installed and where it is installed at the bottom left corner of the interface.

iTunes to Zune HD

4. Switch to iTunes. In iTunes, select the playlist you just created and click the "Burn Disc" button.

5. In the pop-up window of "Burn Settings", select "TuneClon Virtual_CD-RW" from the "CD Burner" drop-down list, click the radio button next to "Audio CD" and tick "Include CD Text" option. Click "Burn" to start burning.

iTunes to Zune HD

6. Upon the completion of burning the disc and encoding the music, you can open the TuneClone manager screen to show all the converted music files. To locate the output folder, simply click the "Folder" tab on the interface.

7. After you get the output music files, connect your Zune HD to computer via the USB cable, drag and drop the converted MP3 files to the Zune Software, then you can sync the iTunes M4P music to Zune HD with the help of Zune Software at ease.

Extracted from http://www.tuneclone.com/transfer-itunes-music-to-zune-hd.php

Thursday, September 03, 2009

Play M4P on HTC Touch Pro

This guide is going to show you how to remove DRM from iTunes music, convert DRM protected iTunes M4P to MP3 and sync iTunes music to HTC Touch Pro. First, let's take a look at the multimedia support of HTC Touch Pro:

Video Playback: Windows Media Player
Music Player: MP3, AAC, AAC+, WMA, WAV, Windows Media Player

So, if you want to play iTunes M4P, M4A, AAC music on your HTC Touch Pro, you just need to use TuneClone Audio Converter to help you convert the iTunes music to HTC Touch Pro compatible format and then transfer the output files to your HTC Touch Pro.


Now let's take a look at how it performs to convert the iTunes music to HTC Touch Pro compatible format using TuneClone Audio Converter:

1. Create a new playlist in iTunes.

2. Add the iTunes songs to the playlist.

3. Launch TuneClone Audio Converter. Click the "Settings" tab. In the pop-up window, you can specify output folder, output file name format, output format, etc for the output files. Note: You can check whether TuneClone virtual CD drive is successfully installed and where it is installed at the bottom left corner of the interface.


4. Switch to iTunes. In iTunes, select the playlist you just created and click the "Burn Disc" button.

5. In the pop-up window of "Burn Settings", select "TuneClon Virtual_CD-RW" from the "CD Burner" drop-down list, click the radio button next to "Audio CD" and tick "Include CD Text" option. Click "Burn" to start burning.


6. Upon the completion of burning the disc and encoding the music, you can open the TuneClone manager screen to show all the converted music files. To locate the output folder, simply click the "Folder" tab on the interface.

After you get the output music files, connect your HTC Touch HD or Touch Pro to computer via the USB cable, darg and drop the converted music to the music folder, then you can play the iTunes M4P music on your HTC Touch HD, Touch Pro at ease.

Extracted from http://www.tuneclone.com/play-itunes-m4p-on-htc-touch-pro.php

Thursday, August 20, 2009

How to remove DRM from Rhapsody music for iPod iPhone

Music purchased from Rhapsody is under DRM protection, which stops customers from playing the downloaded music with other incompatible devices like Apple iPod and Microsoft Zune. If you don't continue to pay, you won't keep the music when the subscription expires. As we all know, iPod is one of the most popular and successful MP3 players. iPod owners can purchase various music songs from iTunes Store and listen to them with their iPods. However, if you prefer Rhapsody and find some songs in Rhapsody that are unavailable in iTunes store, yet you do want to enjoy these songs with your new iPod, you are meeting the headache of Rhapsody being incompatible with iPod. So the following tutorial should be the solution.

The tools you will need:

TuneClone Audio Converter
Rhapsody Software
iPod
iTunes Library

1. Make settings in TuneClone Audio Converter

Download TuneClone (fully compatible with Windows XP and Windows Vista) from http://www.tuneclone.com and install it. After launching TuneClone, click the "Settings" button. In the pop-up dialog of "Options", you can specify the "Output Folder", "Output Filenames", "Output Format" (here we choose MP3), etc. for the output files.

Tip: You can get the output protection removed MP3 music folder by clicking the "Folder" button after the whole process.

transfer rhapsody music to itunes

2. Create a new playlist in Rhapsody

In the center left panel of Rhapsody, navigate to "Playlist". Then in the bottom left corner, click "New" to create a new playlist.

Click "File" and select "New Playlist" to create a new playlist in Rhapsody.

Drag and drop the music you are ready to burn to the new playlist from Rhapsody Library.

transfer rhapsody music to itunes

3. Make CD burning settings in Rhapsody

Click "Tools" and select "Preference..." from the drop-down list. Click "CD Burning" from the list in the left panel. In the "CD Burner Options", choose TuneClone virtual CD drive as preferred CD burner.

transfer rhapsody music to itunes

4. Start to burn

Click the "Burn CD" button to start the burning and encoding process.

After the burning gets started, TuneClone will automatically convert the music file to MP3. You can open the manager screen to show all the converted music files.

transfer rhapsody music to itunes

The most important step is to choose the CD burner. Then the software can convert the music files automatically. It is exceedingly easy when you want to batch convert lots of files.

After you get the output MP3 files converted from the Rhapsody music playlist in your Rhapsody, you can now begin to transfer the MP3 files to your iPod with the sync of iTunes.

Sunday, August 02, 2009

M4P to MP3 Converter

M4P to MP3 Converter

M4P to MP3 Converter is a DRM protected audio and music conversion software which can convert protected iTunes M4A, M4P Files, DRM WMA, DRM protected AAC to plain Audio MP3, WAV, WMA files ready for use on any computers or mobile music devices such as iPod, iPhone, PSP, Zune, cell phone, MP3 player and car MP3 CD players, etc.

This M4P to MP3 Converter uses the Virtual CD burning technology which emulates the whole workflow of burning music to normal CD-R/RW disc: CD ripping, CD burning, MP3 encoding are automatic and with the fastest speed. Its ability to convert DRM protected music files into regular MP3 files makes it a perfect solution for people who purchase their music online but have compatibility issues with their MP3 player.

Monday, July 20, 2009

M4A to MP3 Converter - convert iTunes M4A AAC M4P M4B AA to MP3

TuneClone M4A to MP3 Converter is a DRM remover for converting M4A to MP3 for playback on non-Apple MP3/MP4 players and mobile phone players including Zune, PSP, PS3, BlackBerry, Creative Zen, iriver, Walkman, Pocket PC, Xbox, Nokia, LG, Motorola, Sony Ericsson, Google Phone, etc.

Q: Why Use M4A to MP3 converter?

A: When you purchase music from iTunes Store, they are actually DRM protected content (protected AAC or say M4P) and you will not be able to play the protected AAC (M4P) files on MP3 players which do not support their formats. In such case, the option is to Burn those tracks to a CD and then Rip them once again to the computer hard drive wherein the DRM will be removed and you will get the tracks in (DRM free) MP3 format. After this you will be able to transfer them to a memory card or to most MP3 players.

In case you have purchased a great amount of music from iTunes Store, you can go ahead and use M4A to MP3 Converter which acts as a Virtual CD-ROM drive on your PC, and lets you remove the DRM element without having to waste actual CD's.

Step by Step: Convert M4A to MP3, AAC to MP3, M4B to MP3, M4P to MP3, iTunes to MP3, AA to MP3

Step 1. Download and install M4A to MP3 Converter. Run it. In the main interface, click the "Settings" button. In the pop up window, you can choose the output folder, output file name format, output format (actually you can choose MP3, WMA or WAV), etc for the output files.

m4a to mp3 converter - convert m4a to mp3

Step 2. Create a new playlist in iTunes and add the M4A/AAC/M4B/M4P/iTunes/AA files to the playlist.

Step 3. In iTunes, select the playlist and click the "Burn Disc" button. In the pop-up window of "Burn Settings", select "TuneClon Virtual_CD-RW" from the "CD Burner" drop-down list, click the radio button next to "Audio CD" and tick "Include CD Text" option. Click "Burn" to start burning. Note: You can check whether TuneClone virtual CD drive is successfully installed and where it is installed in the bottom left corner of the TuneClone interface.

m4a to mp3 converter - convert m4a to mp3

Step 4. Upon the completion of burning the disc and encoding the music, you can open the TuneClone manager screen to show all the converted music files. To locate the output folder, simply click the "Folder" tab on the interface.

Wednesday, July 15, 2009

Play iTunes M4P on BlackBerry Tour 9630

"The BlackBerry Tour 9630 itself is really a mash-up of RIM's BlackBerry Bold, BlackBerry Curve 8900 and BlackBerry Storm."

One of the greatest new features I am starting to enjoy on my BlackBerry Tour is the ability for it to play multimedia files and specifically audio (music).

First let's take a look at the video and audio formats supported by the newest BlackBerry Tour 9630:

Video format support: MPEG4 H.263, MPEG4 Part 2 Simple Profile, H.264 (encoding and decoding 30fps), WMV

Audio format support: MP3, AAC, AAC+, eAAC+, WMA, WMA ProPlus

Basically, when you purchase music from iTunes Store, you actually get DRM protected content (in protected AAC or M4P format), which you will not be able to play on MP3/MP4 players and other non-Apple mobile players. In such case, the option is to burn those tracks to an audio CD and then rip them once again to your computer hard drive wherein the DRM will be removed and you will get the tracks in (DRM free) MP3 format. After this you will be able to transfer them to your BlackBerry.

In case you have purchased a great amount of music from iTunes Store, you can go ahead and use TuneClone M4P to MP3 Converter which acts as a Virtual CD-ROM drive on your PC and lets you remove the DRM element without having to waste actual CD's, with the music ID3 tags info well preserved.

You can follow this tutorial to learn how to convert iTunes M4P to MP3 for your BlackBerry using TuneClone M4P to MP3 Converter:

How to Convert iTunes M4P to MP3?


After you get the output MP3 files, you can now begin to transfer them to your BlackBerry Tour:

1. Connect your BlackBerry to you computer via the USB cable.
2. If you have properly enabled your Blackberry as a Mass Storage Device, your Blackberry's microSD card will show as a removable drive on your computer.
3. Double click on the Blackberry folder.
4. Double click on the music folder.
5. Copy your music files to your BlackBerry.
6. Disconnect your Blackberry from the USB cable and go to the "Multimedia" icon on you Blackberry. You need to disconnect when you use the Mass Storage device method as it disables direct access from the BlackBerry when connected to the PC via the USB cable.
7. Click on the Music icon.
8. Click on the Media Card folder.
9. Select your Music folder.
10. Select your Song.
11. Play and enjoy.

Done.

Monday, July 13, 2009

DVD and Video to BlackBerry Tour 9630

You may have at hand many fantastic DVD movies and video files, which you definitely love very much. Also, you have just got a smart BlackBerry Tour 9630 and you really want to watch these DVD movies and video files on your BlackBerry and take them on the road.

However, BlackBerry Tour 9630 only supports:

Video format support: MPEG4 H.263, MPEG4 Part 2 Simple Profile, H.264 (encoding and decoding 30fps), WMV
Audio format support: MP3, AAC, AAC+, eAAC+, WMA, WMA ProPlus

Clone2Go DVD to BlackBerry Converter comes to the rescue! This DVD to BlackBerry Converter has the following three features:

1. Convert DVD movies to BlackBerry (DVD ripper)
2. Convert videos files to BlackBerry (video converter)
3. Download YouTube videos to BlackBerry (YouTube downloader)

So, you just need Clone2Go DVD to BlackBerry Converter to help you rip DVD movies, convert video files and download YouTube videos to the video format accepted by BlackBerry Tour and then transfer the output video files to your BlackBerry Tour. Now let's take a look at how it performs:

Step 1. Import DVD movies, video files and YouTube videos


Insert the DVD disc into the disc drive, click the "Open DVD" button to import it if you are going to watch the DVD movie on your BlackBerry Tour 9630. Or if the DVD movie is saved as a folder on your computer, you need to click the "Add Video" button to locate that folder, which is composed of two separate folders: VIDEO_TS and AUDIO_TS. From the VIDEO_TS folder, select the .vob file to import and then click "OK".

You can also import videos stored on your PC by clicking the "Add Video" button and then click "OK". The supporting formats are shown as follows:

Audio Files (*.mp2;*.mp3;*.wav)
Windows Media Files (*.avi;*.wmv;*.asf;*.dvr-ms;*.ms-dvr)
MOV/MP4 Files (*.mov;*.mp4;*.3gp;*.m4v;*.qt)
Real Media Files (*.rm;*.rmvb)
Flash Video Files (*.flv)
MKV Video Files (*.mkv)
AviSyth Scripts (*.avs)
Other Video Files (*.mpq;*.dv;*.vob;*.m1v;*.m2v;*.dat;*.amv)

If you want to watch YouTube videos on your BlackBerry Tour, click the "YouTube" button on the main interface. In the pop-up window, copy and paste the URLs of the YouTube videos one by one.


There will be a list of the added YouTube videos, which will be downloaded automatically one by one. The downloading status is clearly shown on the list. After the status of all of them indicates "Completed", you can tick whichever videos you want to watch on your BlackBerry Tour.


After the DVD's, videos or YouTube videos are imported, you can preview it on the main interface. If you only want a clip of the DVD/video, you can drag the "Start to trim" and "Stop to trim" buttons to get the certain segment.

Step 2. Choose a proper profile and start encoding

From the drop-down list of "Profile", you can select the most appropriate profile:


Now you can click the "Start Encode" button to starting ripping DVD movies, converting video files and converting YouTube videos for your BlackBerry Tour.

Step 3. Transfer output videos to BlackBerry Tour

After you get the output video files, you can now begin to transfer them to your BlackBerry Tour.

Monday, July 06, 2009

How to convert iTunes M4P to MP3 for Zune PSP BlackBerry

When you purchase music from iTunes Store, you actually get DRM protected content (in protected AAC or M4P format), which you will not be able to play on MP3/MP4 players and other non-Apple mobile players. You cannot directly transfer the M4P files to Zune, PSP, BlackBerry, either. In such case, the option is to burn those tracks to an audio CD and then rip them once again to your computer hard drive wherein the DRM will be removed and you will get the tracks in (DRM free) MP3 format. After this you will be able to transfer them to Zune, PSP, BlackBerry.

In case you have purchased a great amount of music from iTunes Store, you can go ahead and use TuneClone M4P to MP3 Converter which acts as a Virtual CD-ROM drive on your PC and lets you remove the DRM element without having to waste actual CD's, with the music ID3 tags info well preserved. Below is the detailed steps:

Step 1. Create a new playlist in iTunes and add the M4P songs to the playlist.

Step 2. Download and install TuneClone M4P to MP3 Converter. Run it. In the main interface, click the "Settings" button. In the pop up window, you can choose the output folder, output file name format, output format (choose MP3 here), etc for the output files.

convert iTunes M4P to MP3 for Zune PSP BlackBerry

Step 3. Back to iTunes. Click the "Burn Disc" button. In the pop-up window of "Burn Settings", select "TuneClon Virtual_CD-RW" from the "CD Burner" drop-down list, click the radio button next to "Audio CD" and tick "Include CD Text" option. Click "Burn" to start burning. Note: You can check whether TuneClone virtual CD drive is successfully installed and where it is installed in the bottom left corner of the TuneClone interface.

convert iTunes M4P to MP3 for Zune PSP BlackBerry

Step 4. Upon the completion of burning the disc and encoding the music, you can open the TuneClone manager screen to show all the converted music files. To locate the output folder, simply click the "Folder" tab on the interface.

P.S. Burn and Rip iTunes M4P to MP3 for Zune PSP BlackBerry

1. Insert a CD-R or CD-RW disc into your CD-ROM drive.

2. Burn the iTunes M4P playlist to make an audio CD. You cannot select the "MP3 CD" option since it requires the DRM protected iTunes M4P files be converted to MP3 or WMA files for Zune, PSP, BlackBerry.

3. After the audio CD is successfully burned, insert the disc into your CD-ROM drive again. Then you can use iTunes or Windows Media Player to import the music tracks on the burned disc as MP3 or WMA files.

Thursday, June 18, 2009

AAC to MP3 Converter - Convert iTunes AAC M4A M4P to MP3

AAC to MP3 Converter is a DRM removal for converting iTunes to MP3, AAC to MP3, M4A to MP3, M4P to MP3 for playback on non-Apple MP3/MP4 players and mobile phone players including Zune, PSP, PS3, BlackBerry, Creative Zen, iriver, Walkman, Pocket PC, Xbox, Nokia, LG, Motorola, Sony Ericsson, Google Phone, etc.

Q: Why Use AAC to MP3 converter?

A: When you purchase music from iTunes Store, they are actually DRM protected content and you will not be able to play the protected AAC (M4P) files on MP3 players which do not support their formats. In such case, the option is to Burn those tracks to a CD and then Rip them once again to the computer hard drive wherein the DRM will be removed and you will get the tracks in (DRM free) MP3 format. After this you will be able to transfer them to a memory card or to MP3/MP4 players.

In case you have purchased a great amount of music from iTunes Store, you can go ahead and use AAC to MP3 Converter which acts as a Virtual CD-ROM drive on your PC, and lets you remove the DRM element without having to waste actual CD's.

How to: Convert iTunes AAC M4A M4P to MP3 Using AAC to MP3 Converter?

Step 1. Create a new playlist in iTunes and add the iTunes/AAC/M4A/M4P songs to the playlist.

Step 2. Download and install AAC to MP3 Converter. Run it. In the main interface, click the "Settings" button. In the pop up window, you can choose the output folder, output file name format, output format (actually you can choose MP3, WMA or WAV), etc for the output files.

aac to mp3 converter - convert aac to mp3

Step 3. Back to iTunes. Click the "Burn Disc" button. In the pop-up window of "Burn Settings", select "TuneClon Virtual_CD-RW" from the "CD Burner" drop-down list, click the radio button next to "Audio CD" and tick "Include CD Text" option. Click "Burn" to start burning. Note: You can check whether TuneClone virtual CD drive is successfully installed and where it is installed in the bottom left corner of the TuneClone interface.

aac to mp3 converter - convert aac to mp3

Step 4. Upon the completion of burning the disc and encoding the music, you can open the TuneClone manager screen to show all the converted music files. To locate the output folder, simply click the "Folder" tab on the interface.

Wednesday, June 10, 2009

How to convert DVD to iPhone 3G

This is for all those iPhone 3G owners still in fix and searching for ways to watch videos on your new gadget. Today I'll let you know how to watch DVD movies and videos from other sources on your iPhone.

To begin with you need to know the formats your iPhone can play.

The Video Formats Supported by iPhone Include

H.264 video, up to 1.5 Mbps, 640 by 480 pixels, 30 frames per second, Low-Complexity version of the H.264 Baseline Profile with AAC-LC audio up to 160 Kbps, 48kHz, stereo audio in .m4v, .mp4, and .mov file formats; H.264 video, up to 2.5 Mbps, 640 by 480 pixels, 30 frames per second, Baseline Profile up to Level 3.0 with AAC-LC audio up to 160 Kbps, 48kHz, stereo audio in .m4v, .mp4, and .mov file formats; MPEG-4 video, up to 2.5 Mbps, 640 by 480 pixels, 30 frames per second, Simple Profile with AAC-LC audio up to 160 Kbps, 48kHz, stereo audio in .m4v, .mp4, .mov file formats

The Audio Formats Supported by iPhone Include

MP3, MP3 VBR, WAV, AAC, Protected AAC, Audible (formats 2, 3, and 4), Apple Lossless, AIFF

Now to watch the DVD movies and videos what you need to do is simply rip the DVD movies or convert the video files into a video/audio format supported by iPhone 3G. After you have the files in a compatible format upload them into your iPhone through the sync of iTunes Library.

To convert the video files you need to download the Clone2Go DVD to iPhone Converter.

So are you all set? Let's start the process now.

Step 1


  1. First open the iPhone converter.

  2. Add DVD video or audio files.

  3. If the DVD movie you need to convert is on your disc drive, click on the DVD button.

  4. In case you have saved it in a hard drive, click the Add video button and locate the folder.

  5. Locate the path of the folders VIDEO_TS and AUDIO_TS. the .vob files appear.
    Select the .vob files and click OK.

  6. By clicking on the Add video button you can also import video from various other sources.


watch DVD and video on iPhone 3G

The formats that are supported include

Audio Files (*.mp2,*.mp3,*.wav)
Windows Media Player(*.avi,*.wmv,*.asf,*.dvr-ms,*.ms-dvr)
MOV/MP4 Files(*.mov,*.mp4,*3gp,*.mp4,*.qt)
Real Media Player(*.flv)
Flash Video Player(*.mkv)
MKV Video Player(*.avs)
AviSYnth Scripts(*.mpg,*.vob,*.dv,*.m1v,*.m2v,*.dat,*.amv)

Once the DVD or video has been been imported you can watch it on the main interface.

Here's your chance to pick the DVD or video you wish to play on your iPhone. Select the portion you want to play. Drag from the Start to trim and Stop to trim button to select the segment.

Step 2

To choose the proper profile look for the drop-down list of Profile option on the right. Choose the profile that suits you best. Like for instance if you want to play the video in MPEG-4 choose the iPhone MPEG-4 Video from the list of profiles.

watch DVD and video on iPhone 3G

The Clone2Go DVD to iPhone Converter also allows you to convert the online YouTube Videos for your iPhone 3G.

Step 3

Click on the Start Encode button to start converting videos or ripping DVD's for iPhone 3G.

Step 4

After the ripping or conversion is complete, go to the Folder button on the main menu to get the converted video/audio files.

You are done. Now upload them into your iPhone through the sync of iTunes Library and start playing.

How to add music to iPhone

The following article focuses on different channels of listening to music on iPod and iPhone. To enjoy music on iPod and iPhone, you first need to get the music in iPod/iPhone format onto iTunes library and then sync the music to your iPod/iPhone.

Channel 1. Buy music from iTunes Store for iPod/iPhone

To find and buy music from the iTunes Store, just click on the "iTunes Store" link under "Store" in the left column of iTunes. Once in, you're greeted with the iTunes Store interface, with links on the left-hand side that take you to Music, Movies, TV Shows, Music Videos, Audiobooks, and Podcasts. After you've chosen a song or album to buy, just click on the "Buy Song" or "Buy Album" button for that selection.


Channel 2. Import your CDs into iTunes for iPod/iPhone

If you own a few CDs, you can import them into iTunes for your iPod/iPhone. Since you've already spent money on this music, there's no reason why you should have to buy it all over again just to get the songs into iTunes. Apple made it simple to rip a CD to your library.


By default, iTunes rips songs to AAC format, and although AAC is a very high-quality format, it isn't as widely-supported as the ubiquitous MP3 format, which enjoys support from virtually every digital music player known to man, including iPod and iPhone. To ensure greater portability of your music (and prevent you from feeling locked into one product just because you've ripped all your music in one format), I suggest ripping your CDs as MP3s. To do so, go to Edit -> Preferences. In the General tab, click the Import Settings... button. In the pop up dialog window of Import Settings, select MP3 Encoder from the Import Using dropdown menu and Higher Quality (192 kbps) from the Setting dropdown.


There are many other subscription music services you may already be subscribed to, like Rhapsody, Napster, and Zune Marketplace, which let you buy or rent tracks. But the songs that come from these stores use a Digital Rights Management (DRM) scheme that is incompatible with iTunes and the iPod/iPhone. In other words, these songs are protected from being played in software and hardware music players that don't support their particular standard (just like non-iPod music players can't play most music from the iTunes Music Store). There is software tool called TuneClone Audio Converter that claims to be able to remove DRM from Rhapsody, Napster and Zune Marketplace and convert the DRM protected music to MP3, WAV and unprotected WMA with a virtual CD drive. So if you want to transfer your Rhapsody/Napster/Zune music to iTunes for your iPod/iPhone, you mnay download this piece of software to help you get the music DRM removed and converted to MP3 for a try.


However, the online digital music store eMusic sells DRM-free MP3s, and there are many websites where you can download free and legal MP3s that don't contain DRM and can be imported into the iPhone easily.

Channel 3. Import MP3s into iTunes for iPod/iPhone

Once you've downloaded MP3s onto your computer, it's easy to import them into iTunes. First make a new playlist by going to the "File" menu and clicking "New Playlist" and naming it anything you like. Select that playlist in iTunes, then drag your MP3s from your hard drive into the right-hand pane. iTunes will start importing your music and populating the playlist with songs. After it's done, you're free to play back the songs or sync them to your iPod/iPhone just like all the rest of your library.

Channel 4. Import WMAs into iTunes for iPod/iPhone

Importing unprotected WMA files is just like importing MP3 files, but requires one additional step. With WMA files, iTunes will actually transcode the songs and change the format from WMA to whatever default audio encoder you've set in the iTunes Preferences. It's not necessary to know the difference between WMAs, MP3s, and AACs, but you should know that when you import WMAs, your original files are untouched and a new file is created.

Note: For importing DRM protected WMA files into iTunes, you will need to remove the DRM first. I've found TuneClone Audio Converter can also be used to convert DRM protected WMA to MP3. There's a tutorial on its website that details how to convert protected WMA to MP3 for iPod. I've followed it step by step to have a try. It worked great as a whole except that it didn't preserve the music metadata very well though the tutorial offered a reluctant solution.

Put iTunes M4P onto Windows Media Player

The following tutorial will show you how to remove DRM from iTunes protected AAC (M4P) music and convert M4P to (DRM free) WMA/MP3 so as to put iTunes M4P music onto Windows Media Player for syncing to a lot more mobile players.

Why Put iTunes M4P music onto Windows Media Player?

When you purchase music from iTunes Store, you actually get DRM protected content (in protected AAC or M4P format), which you will not be able to play on MP3/MP4 players and other non-Apple mobile players. You cannot directly transfer the M4P files to Windows Media Player, either. In such case, the option is to burn those tracks to an audio CD and then rip them (with iTunes or Windows Media Player) once again to your computer hard drive wherein the DRM will be removed and you will get the tracks in (DRM free) MP3 or WMA format. After this you will be able to transfer them to Windows Media Player.

In case you have purchased a great amount of music from iTunes Store, you can go ahead and use TuneClone M4P to MP3 Converter which acts as a Virtual CD-ROM drive on your PC and lets you remove the DRM element without having to waste actual CD's, with the music ID3 tags info well preserved.

Step by Step: Burn and Rip iTunes M4P Music for Windows Media Player?

1. Insert a CD-R or CD-RW disc into your CD-ROM drive.
2. Burn the iTunes M4P playlist to make an audio CD. You cannot select the "MP3 CD" option since it requires the DRM protected iTunes M4P files be converted to MP3 or WMA files for Windows Media Player.
3. After the audio CD is successfully burned, insert the disc into your CD-ROM drive again. Then you can use iTunes or Windows Media Player to import the music tracks on the burned disc as MP3 or WMA files.

Step by Step: Convert iTunes M4P Music for Windows Media Player with TuneClone

1. Create a new playlist in iTunes.

2. Add the M4P songs to the playlist.

3. Launch TuneClone M4P to MP3 Converter. Click the "Settings" tab. In the pop-up window, you can specify output folder, output file name format, output format (choose MP3 or WMA), etc for the output files. Note: You can check whether TuneClone virtual CD drive is successfully installed and where it is installed in the bottom left corner of the interface.

put itunes m4p music to windows media player

4. Switch to iTunes. In iTunes, click the "Burn Disc" button.

5. In the pop-up window of "Burn Settings", select "TuneClon Virtual_CD-RW" from the "CD Burner" drop-down list, click the radio button next to "Audio CD" and tick "Include CD Text" option. Click "Burn" to start burning.

put itunes m4p music to windows media player

6. Upon the completion of burning the disc and encoding the music, you can open the TuneClone manager screen to show all the converted music files. To locate the output folder, simply click the "Folder" tab on the interface.

Put iTunes M4P onto Limewire Napster Rhapsody

The following tutorial will show you how to remove DRM from iTunes protected AAC (M4P) music and convert M4P to (DRM free) WMA/MP3 so as to put iTunes M4P music onto Rhapsody, Napster, Limewire for syncing to a lot more mobile players.


Why Put iTunes M4P music onto Rhapsody Napster Limewire?


When you purchase music from iTunes Store, you actually get DRM protected content (in protected AAC or M4P format), which you will not be able to play on MP3/MP4 players and other non-Apple mobile players. You cannot directly transfer the M4P files to Rhapsody, Napster, Limewire, either. In such case, the option is to burn those tracks to an audio CD and then rip them once again to your computer hard drive wherein the DRM will be removed and you will get the tracks in (DRM free) MP3 or WMA format. After this you will be able to transfer them to Limewire, Rhapsody or Napster.

In case you have purchased a great amount of music from iTunes Store, you can go ahead and use TuneClone M4P to MP3 Converter which acts as a Virtual CD-ROM drive on your PC and lets you remove the DRM element without having to waste actual CD's, with the music ID3 tags info well preserved.


Step by Step: Burn and Rip iTunes M4P Music for Limewire/Rhapsody/Napster?


1. Insert a CD-R or CD-RW disc into your CD-ROM drive.

2. Burn the iTunes M4P playlist to make an audio CD. You cannot select the "MP3 CD" option since it requires the DRM protected iTunes M4P files be converted to MP3 or WMA files for Rhapsody, Napster, Limewire.

3. After the audio CD is successfully burned, insert the disc into your CD-ROM drive again. Then you can use iTunes or Windows Media Player to import the music tracks on the burned disc as MP3 or WMA files.


Step by Step: Convert iTunes M4P Music for Rhapsody/Napster/Limewire with TuneClone M4P to MP3 Converter


1. Create a new playlist in iTunes.

2. Add the M4P songs to the playlist.

3. Launch TuneClone M4P to MP3 Converter. Click the "Settings" tab. In the pop-up window, you can specify output folder, output file name format, output format (choose MP3 or WMA), etc for the output files. Note: You can check whether TuneClone virtual CD drive is successfully installed and where it is installed in the bottom left corner of the interface.


4. Switch to iTunes. In iTunes, click the "Burn Disc" button.

5. In the pop-up window of "Burn Settings", select "TuneClon Virtual_CD-RW" from the "CD Burner" drop-down list, click the radio button next to "Audio CD" and tick "Include CD Text" option. Click "Burn" to start burning.


6. Upon the completion of burning the disc and encoding the music, you can open the TuneClone manager screen to show all the converted music files. To locate the output folder, simply click the "Folder" tab on the interface.

Thursday, May 07, 2009

How to convert YouTube video and burn YouTube video to DVD

The following tutorial will show you how to download videos from YouTube, convert YouTube video to AVI, MP4, MOV, WMV, 3GP, iPod, iPhone, Zune, PSP, BlackBerry and burn YouTube videos to DVD. It is divided into three parts:

Part 1. How to download videos from YouTube?
Part 2. How to convert YouTube videos to AVI/MP4/3GP/WMV/MOV/iPod/Zune?
Part 3. How to burn YouTube video to DVD?

Part 1. How to download YouTube videos from YouTube?

If you've got a high speed Internet connection and a video file you'd like to download for your mobile player, the easiest method is with the Zamzar website (http://www.zamzar.com/url/).

download videos from YouTube

The steps are quite simple. When your video has been downloaded to the format you specified, you'll receive an email with a link to download the file. Remember that Zamzar has a 100MB limit on videos, so if the video you are going to download is larger than 100MB, you'd have to turn to a software application to help you download it. Here I'd recommend using Clone2Go YouTube Downloader, which is totally free and works nice.

Part 2. How to convert YouTube videos to AVI/MP4/3GP/WMV/MOV/iPod/Zune?

The software you need is Clone2Go Video Converter ( free download ).

convert YouTube videos to AVI, MP4, WMV, iPod, iPhone

Here is how it works:

1. Import YouTube FLV file to the program.
2. Choose an output format. For example, if you want to watch the YouTube video on iPod, you can choose "iPod MPEG-4" as the output format.
3. Start to convert.

Part 3. How to burn YouTube video to DVD?

If you want to burn YouTube FLV videos to DVD, you will need DVD authoring software. Here, I'd recommend using DV to DVD Converter ( free download ). Below is the screenshot of this program:

burn YouTube FLV videos to DVD

Let's take a look at how it performs:

1. Import videos converted from YouTube (in Part 2) to the program by clicking the "ADD Video Files" button.
2. Choose DVD menu, DVD theme, transition effects, etc for the output DVD file.
3. Insert a DVD disc into your PC and click "Burn DVD Disc" button to start burning videos to DVD.