TuneClone today announced that TuneClone Audio Converter ( http://www.tuneclone.com ) is now available for both Windows and Mac users who need to remove DRM copy protection from purchased music files in iTunes store in a legal way. The basic principle of this piece of music DRM removal software is that it simulates the process of burning an "Audio CD" and ripping it back. TuneClone Audio Converter makes a virtual CD-ROM drive, tricking your PC into believing that you are burning a CD. Therefore, the DRM is removed without wasting a CD.
Basically, when you purchase music from iTunes store, they are actually DRM protected content (in protected .aac or .m4p format) and you will not be able to play the .m4p files on MP3 players which do not support their formats. In other words, you are not allowed to play them beyond Apple environment, such as iTunes library, iPod, iPhone, iPad, etc. In such case, the option is to burn those tracks to a CD and then rip them once again to the computer HD wherein the DRM will be removed and you will get the tracks in (DRM free) .mp3 format. After this you will be able to transfer them to a memory card or to most MP3 players or mobile phones.
In case you have purchased a great amount of music from iTunes store, you can go ahead and use TuneClone which acts as a Virtual CD-ROM drive on your PC, and lets you remove the DRM element without having to waste actual CD's.
TuneClone is basically a program that acts as a virtual CD drive that allows you "burn" MP3 from iTunes and "rip" it. TuneClone "lies" to your computer saying that you have a CD-RW drive that it will burn to (like Alchohol 120%). You can use this to move your library of DRM protected music to the MP3 format that you can use on any player out there worth its salt. This is a useful tool for anyone looking to break their relationship with the iPod. The best part is that it maintains all of the music file's metadata.
Apart from removing DRM from iTunes .m4p music files, TuneClone (Windows & Mac) can also be used to convert iTunes aac to mp3, m4a to mp3, m4b to mp3, etc. It is dedicated to helping you convert any iTunes music to mp3 file so that you can play them on MP3/MP4 players or other mobile players such as Microsoft Zune, Sony PSP, RIM BlackBerry, Creative Zune, iriver, SanDisk Sansa, Sony Walkman, Cell Phone, Pocket PC, etc.
Showing posts with label remove drm. Show all posts
Showing posts with label remove drm. Show all posts
Friday, August 20, 2010
Wednesday, October 21, 2009
Removing DRM from iTunes Music on Mac
The following article will share with you four ways of removing DRM protection from iTunes music on Mac OS X. You can choose your favorite method to help you convert iTunes M4P music to MP3 or (DRM free) AAC format for playback on MP3 Player, MP4 Player, Mobile Phone Player, etc.
Method 1. Remove DRM from iTunes music with burning-and-ripping method
1. Insert a CD-R or CD-RW disc into your CD-ROM drive
2. Run iTunes, create a new playlist and burn it to make an "Audio CD"
3. After the Audio CD is successfully burned, insert the disc into your CD-ROM drive again. Then you can use iTunes to import the music tracks on the burned disc as whatever format (MP3, AAC, etc) you selected in iTunes preferences for importing.
Method 2. Remove DRM from iTunes music with Virtual CD Burner
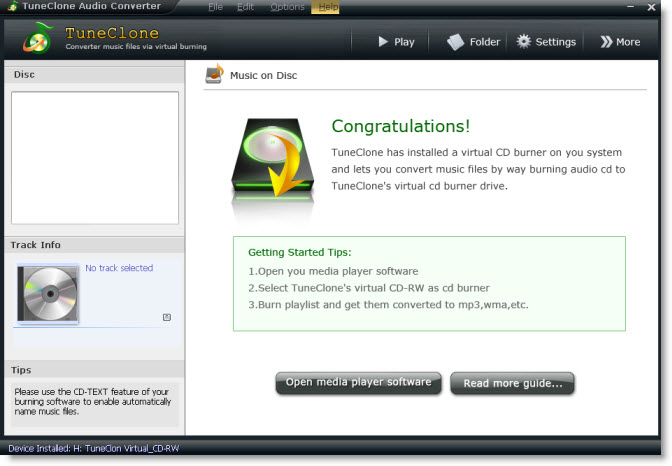
You will need to download TuneClone Audio Converter for Mac first. Run this DRM Removal Software and it will let you install a virtual CD burner, which will be used to convert iTunes music files.
Run iTunes, create a new playlist and add the DRM protected iTunes songs to the playlist.
Right click this playlist and choose "Burn Playlist to Disc". Alternatively, you can click the "Burn Disc" button at the lower right corner of iTunes interface.
In the pop-up dialog of "Burn Settings", select "CDWriter TuneClone" as default CD Burner, choose "Audio CD" as Disc Format and tick "Include CD Text" ( to perserve the music metadata such as name, artist, album names ).

Tip: You can easily get the output MP3 files on your Mac machine by clicking the "Reveal in Finder" button on the manager screen.
Method 3. Remove DRM from iTunes music with iMovie '09
Run iMovie and create a New Project. In the iMovie window, select the 'Music' tab. You will notice that the top right portion of the interface now offers a media browser. Locate the playlist which contains purchased music, or search by artist/title.

Select the DRM-laden song and drag the file from the media browser into the iMovie timeline.
In order to export the song, iMovie requires that a visual image be associated with the audio track - iMovie thinks that it is going to be exporting a movie. Simply drag a blank image (or any other image) to the track above the previously imported audio file. Once iMovie has processed the image, select the 'Export using QuickTime…' sub menu item from found inside 'Share' in iMovie's menu bar.

In the Save as… dialogue, select "Sound to AIFF" in the Export drop-down menu, Choose an appropriate directory for iMovie to export to, title the file, and select 'Save'.

Locate the exported AIFF audio file and drag to your iTunes Library. Right-click on the file and select "Create MP3 Version". Once completed, 'Get Info' on the new file, edit meta data, add album art, and trash the originally purchased and AIFF audio files from your iTunes library.
Method 4. Remove DRM from iTunes music with FairGame
FairGame is freeware to remove DRM protection from iTunes music on Mac OS X. It will convert the DRMed songs you bought on the iTunes Store to an unprotected format (using iTunes default encoder) and keep all the original metadata, lyrics and artwork. FairGame doesn't do lossless DRM stripping. It re-encodes protected AAC files purchased in iTMS into unprotected AAC file using Apple's iMovie software.

What you MUST DO (only once) to get FairGame to work:
enable "Access for assistive devices" in the "Universal Access" system preference
select "Place clip in Movie Timeline" in the "Import" preference of iMovie HD
Then you can simply:
select some songs in iTunes
click on the "Process songs" button
Don't touch anything and wait until it's done…(FairGame is scripting iMovie's interface to process the songs, don't interfere)
Thursday, September 03, 2009
Play M4P on HTC Touch Pro
This guide is going to show you how to remove DRM from iTunes music, convert DRM protected iTunes M4P to MP3 and sync iTunes music to HTC Touch Pro. First, let's take a look at the multimedia support of HTC Touch Pro:
Video Playback: Windows Media Player
Music Player: MP3, AAC, AAC+, WMA, WAV, Windows Media Player
So, if you want to play iTunes M4P, M4A, AAC music on your HTC Touch Pro, you just need to use TuneClone Audio Converter to help you convert the iTunes music to HTC Touch Pro compatible format and then transfer the output files to your HTC Touch Pro.

Now let's take a look at how it performs to convert the iTunes music to HTC Touch Pro compatible format using TuneClone Audio Converter:
1. Create a new playlist in iTunes.
2. Add the iTunes songs to the playlist.
3. Launch TuneClone Audio Converter. Click the "Settings" tab. In the pop-up window, you can specify output folder, output file name format, output format, etc for the output files. Note: You can check whether TuneClone virtual CD drive is successfully installed and where it is installed at the bottom left corner of the interface.

4. Switch to iTunes. In iTunes, select the playlist you just created and click the "Burn Disc" button.
5. In the pop-up window of "Burn Settings", select "TuneClon Virtual_CD-RW" from the "CD Burner" drop-down list, click the radio button next to "Audio CD" and tick "Include CD Text" option. Click "Burn" to start burning.

6. Upon the completion of burning the disc and encoding the music, you can open the TuneClone manager screen to show all the converted music files. To locate the output folder, simply click the "Folder" tab on the interface.
After you get the output music files, connect your HTC Touch HD or Touch Pro to computer via the USB cable, darg and drop the converted music to the music folder, then you can play the iTunes M4P music on your HTC Touch HD, Touch Pro at ease.
Extracted from http://www.tuneclone.com/play-itunes-m4p-on-htc-touch-pro.php
Video Playback: Windows Media Player
Music Player: MP3, AAC, AAC+, WMA, WAV, Windows Media Player
So, if you want to play iTunes M4P, M4A, AAC music on your HTC Touch Pro, you just need to use TuneClone Audio Converter to help you convert the iTunes music to HTC Touch Pro compatible format and then transfer the output files to your HTC Touch Pro.
Now let's take a look at how it performs to convert the iTunes music to HTC Touch Pro compatible format using TuneClone Audio Converter:
1. Create a new playlist in iTunes.
2. Add the iTunes songs to the playlist.
3. Launch TuneClone Audio Converter. Click the "Settings" tab. In the pop-up window, you can specify output folder, output file name format, output format, etc for the output files. Note: You can check whether TuneClone virtual CD drive is successfully installed and where it is installed at the bottom left corner of the interface.
4. Switch to iTunes. In iTunes, select the playlist you just created and click the "Burn Disc" button.
5. In the pop-up window of "Burn Settings", select "TuneClon Virtual_CD-RW" from the "CD Burner" drop-down list, click the radio button next to "Audio CD" and tick "Include CD Text" option. Click "Burn" to start burning.
6. Upon the completion of burning the disc and encoding the music, you can open the TuneClone manager screen to show all the converted music files. To locate the output folder, simply click the "Folder" tab on the interface.
After you get the output music files, connect your HTC Touch HD or Touch Pro to computer via the USB cable, darg and drop the converted music to the music folder, then you can play the iTunes M4P music on your HTC Touch HD, Touch Pro at ease.
Extracted from http://www.tuneclone.com/play-itunes-m4p-on-htc-touch-pro.php
Thursday, August 20, 2009
How to remove DRM from Rhapsody music for iPod iPhone
Music purchased from Rhapsody is under DRM protection, which stops customers from playing the downloaded music with other incompatible devices like Apple iPod and Microsoft Zune. If you don't continue to pay, you won't keep the music when the subscription expires. As we all know, iPod is one of the most popular and successful MP3 players. iPod owners can purchase various music songs from iTunes Store and listen to them with their iPods. However, if you prefer Rhapsody and find some songs in Rhapsody that are unavailable in iTunes store, yet you do want to enjoy these songs with your new iPod, you are meeting the headache of Rhapsody being incompatible with iPod. So the following tutorial should be the solution.
The tools you will need:
TuneClone Audio Converter
Rhapsody Software
iPod
iTunes Library
1. Make settings in TuneClone Audio Converter
Download TuneClone (fully compatible with Windows XP and Windows Vista) from http://www.tuneclone.com and install it. After launching TuneClone, click the "Settings" button. In the pop-up dialog of "Options", you can specify the "Output Folder", "Output Filenames", "Output Format" (here we choose MP3), etc. for the output files.
Tip: You can get the output protection removed MP3 music folder by clicking the "Folder" button after the whole process.

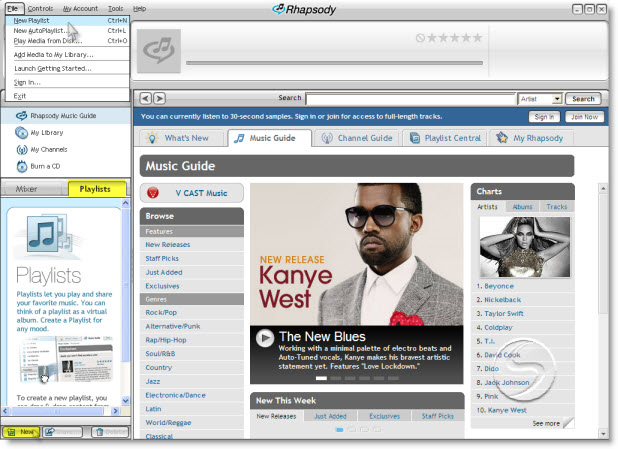
2. Create a new playlist in Rhapsody
In the center left panel of Rhapsody, navigate to "Playlist". Then in the bottom left corner, click "New" to create a new playlist.
Click "File" and select "New Playlist" to create a new playlist in Rhapsody.
Drag and drop the music you are ready to burn to the new playlist from Rhapsody Library.

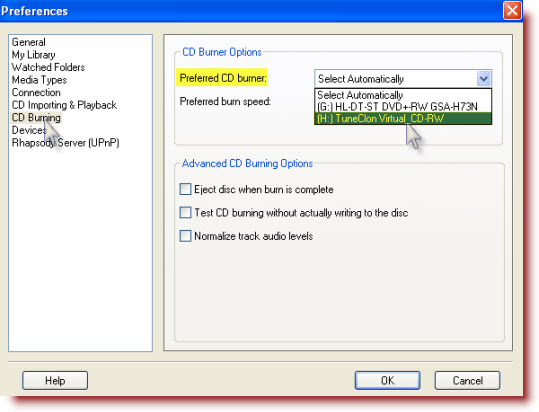
3. Make CD burning settings in Rhapsody
Click "Tools" and select "Preference..." from the drop-down list. Click "CD Burning" from the list in the left panel. In the "CD Burner Options", choose TuneClone virtual CD drive as preferred CD burner.

4. Start to burn
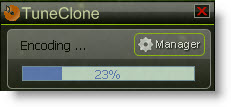
Click the "Burn CD" button to start the burning and encoding process.
After the burning gets started, TuneClone will automatically convert the music file to MP3. You can open the manager screen to show all the converted music files.

The most important step is to choose the CD burner. Then the software can convert the music files automatically. It is exceedingly easy when you want to batch convert lots of files.
After you get the output MP3 files converted from the Rhapsody music playlist in your Rhapsody, you can now begin to transfer the MP3 files to your iPod with the sync of iTunes.
The tools you will need:
TuneClone Audio Converter
Rhapsody Software
iPod
iTunes Library
1. Make settings in TuneClone Audio Converter
Download TuneClone (fully compatible with Windows XP and Windows Vista) from http://www.tuneclone.com and install it. After launching TuneClone, click the "Settings" button. In the pop-up dialog of "Options", you can specify the "Output Folder", "Output Filenames", "Output Format" (here we choose MP3), etc. for the output files.
Tip: You can get the output protection removed MP3 music folder by clicking the "Folder" button after the whole process.
2. Create a new playlist in Rhapsody
In the center left panel of Rhapsody, navigate to "Playlist". Then in the bottom left corner, click "New" to create a new playlist.
Click "File" and select "New Playlist" to create a new playlist in Rhapsody.
Drag and drop the music you are ready to burn to the new playlist from Rhapsody Library.
3. Make CD burning settings in Rhapsody
Click "Tools" and select "Preference..." from the drop-down list. Click "CD Burning" from the list in the left panel. In the "CD Burner Options", choose TuneClone virtual CD drive as preferred CD burner.
4. Start to burn
Click the "Burn CD" button to start the burning and encoding process.
After the burning gets started, TuneClone will automatically convert the music file to MP3. You can open the manager screen to show all the converted music files.
The most important step is to choose the CD burner. Then the software can convert the music files automatically. It is exceedingly easy when you want to batch convert lots of files.
After you get the output MP3 files converted from the Rhapsody music playlist in your Rhapsody, you can now begin to transfer the MP3 files to your iPod with the sync of iTunes.
Monday, December 15, 2008
TuneClone V1.30 - remove DRM from iTunes M4P M4B WMA Napster using virtual CD drive
The newest version of TuneClone - TuneClone V1.30 - was released on December 15,2008!
TuneClone Audio Converter is a powerful yet easy to use DRM remover and music converter program for removing DRM from iTunes music, Windows Media Player music, RealPlayer music, WinAMP music, Napster music, Rhapsody music, etc., with the music metadata well preserved.
Unlike other media converters, TuneClone Audio Converter applies the virtual CD burning technology to remove the DRM. It generates a virtual CD-ROM drive, tricking your PC into believing that you are burning a CD. Therefore, the DRM is removed without wasting a CD.
TuneClone Audio Converter can be used to convert iTunes protected AAC (M4P), M4B, M4A, protected WMA to MP3, WAV and unprotected WMA. It removes the DRM from protected iTunes M4P or protected WMA so as to help you play the DRM-laden music on media players or MP3 players like Microsoft Zune, Sony PSP, BlackBerry, Creative Zune, iriver, SanDisk Sansa, Sony Walkman, Cell Phone(Sony Ericsson, Motorola, Nokia N-series, Samsung Anycall, LG, etc.) Pocket PC, PDA and so on.
Key features of TuneClone V1.30: (from http://www.tuneclone.com)
1. Easy to install and easy to use via a simple user interface.
2. Remove DRM from purchased or protected music from iTunes, Windows Media Player, RealPlayer, WinAMP, Napster, Rhapster, etc, using automatically generated virtual CD drive.
3. Convert DRM protected music to plain MP3 format for playback on all kinds of MP3 players or media players like Zune, PSP, BlackBerry, Creative Zen, iriver, Walkman, etc.
4. Remove DRM from purchased music files by applying the virtual CD burning technology, which adopts the maximum writing speed so that your music files can be converted at a very high speed.
5. Convert iTunes protected AAC (M4P), M4B and M4A to MP3, WAV and WMA.
6. Convert protected WMA (Windows Media Audio) to MP3, WAV and unprotected WMA.
7. Well Preserve ID3 tags for artist, album, title names, artworks, etc.
8. The converted songs will have no DRM restriction any more.
Availability, price and support
More information about TuneClone V1.30 is available at http://www.tuneclone.com/index.php. You can free download TuneClone V1.30 from http://www.tuneclone.com/tuneclone_setup.exe for a try.
The full version of TuneClone V1.30 costs USD34.95.
If you have questions about or show interest in TuneClone V1.30, please feel free to contact TuneClone support team via support@tuneclone.com.
Monday, December 08, 2008
Remove DRM from iTunes with TuneClone virtual CD burner
Basically, when you buy music from iTunes, it comes with a copyright protection called DRM. These DRM-protected songs are locked so that they only work with Apple MP3 players. That means that if you bought a Microsoft Zune, you cannot use iTunes music.
So, what is the solution? You have to burn a CD. When you do this, the DRM is removed (because the music is converted to a non-DRM-compatible media). After you burn the CD, you can rip it to your PC as an MP3 file which no longer has DRM.
Alternatively, you can use TuneClone (http://www.tuneclone.com/index.php).

TuneClone makes a virtual CD-ROM drive, tricking your PC into believing that you are burning a CD. Therefore, the DRM is removed without wasting a CD.
Here is a link to a tutorial using TuneClone and iTunes 8:
http://itunesm4ptomp3.wordpress.com/2008/09/16/convert-itunes8-music-to-mp3/
So, what is the solution? You have to burn a CD. When you do this, the DRM is removed (because the music is converted to a non-DRM-compatible media). After you burn the CD, you can rip it to your PC as an MP3 file which no longer has DRM.
Alternatively, you can use TuneClone (http://www.tuneclone.com/index.php).
TuneClone makes a virtual CD-ROM drive, tricking your PC into believing that you are burning a CD. Therefore, the DRM is removed without wasting a CD.
Here is a link to a tutorial using TuneClone and iTunes 8:
http://itunesm4ptomp3.wordpress.com/2008/09/16/convert-itunes8-music-to-mp3/
Tuesday, December 02, 2008
Rhapsody to iTunes for iPod
Music purchased from Rhapsody is under DRM protection, which stops customers from playing the downloaded music with other incompatible devices like Apple iPod and Microsoft Zune. If you don't continue to pay, you won't keep the music when the subscription expires. As we all know, iPod is one of the most popular and successful MP3 players. iPod owners can purchase various music songs from iTunes Store and listen to them with their iPods. However, if you prefer Rhapsody and find some songs in Rhapsody that are unavailable in iTunes store, yet you do want to enjoy these songs witn your new iPod, you are meeting the headache of Naspter being incompatible with iPod. So the following tutorial should be the solution.
The tools you will need:
TuneClone Audio Converter
Rhapsody Software
iPod
iTunes Library
1. Make settings in TuneClone Audio Converter
Download TuneClone (fully compatible with Windows XP and Windows Vista) from http://www.tuneclone.com/tuneclone_setup.exe and install it. After launching TuneClone, click the "Settings" button. In the pop-up dialog of "Options", you can specify the "Output Folder", "Output Filenames", "Output Format" (here we choose MP3), etc. for the output files.
Tip: You can get the output protection removed MP3 music folder by clicking the "Folder" button after the whole process.

2. Create a new playlist in Rhapsody
In the center left panel of Rhapsody, navigate to "Playlist". Then in the bottom left corner, click "New" to create a new playlist.
Click "File" and select "New Playlist" to create a new playlist in Rhapsody.
Drag and drop the music you are ready to burn to the new playlist from Rhapsody Library.
3. Make CD burning settings in Rhapsody
Click "Tools" and select "Preference..." from the drop-down list. Click "CD Burning" from the list in the left panel. In the "CD Burner Options", choose TuneClone virtual CD drive as preferred CD burner.
4. Start to burn
Click the "Burn CD" button to start the burning and encoding process.
After the burning gets started, TuneClone will automatically convert the music file to MP3. You can open the manager screen to show all the converted music files.
The most important step is to choose the CD burner. Then the software can convert the music files automatically. It is exceedingly easy when you want to batch convert lots of files.
After you get the output MP3 files converted from the Rhapsody music playlist in your Rhapsody, you can now begin to transfer the MP3 files to your iPod with the sync of iTunes.
The tools you will need:
TuneClone Audio Converter
Rhapsody Software
iPod
iTunes Library
1. Make settings in TuneClone Audio Converter
Download TuneClone (fully compatible with Windows XP and Windows Vista) from http://www.tuneclone.com/tuneclone_setup.exe and install it. After launching TuneClone, click the "Settings" button. In the pop-up dialog of "Options", you can specify the "Output Folder", "Output Filenames", "Output Format" (here we choose MP3), etc. for the output files.
Tip: You can get the output protection removed MP3 music folder by clicking the "Folder" button after the whole process.
2. Create a new playlist in Rhapsody
In the center left panel of Rhapsody, navigate to "Playlist". Then in the bottom left corner, click "New" to create a new playlist.
Click "File" and select "New Playlist" to create a new playlist in Rhapsody.
Drag and drop the music you are ready to burn to the new playlist from Rhapsody Library.
3. Make CD burning settings in Rhapsody
Click "Tools" and select "Preference..." from the drop-down list. Click "CD Burning" from the list in the left panel. In the "CD Burner Options", choose TuneClone virtual CD drive as preferred CD burner.
4. Start to burn
Click the "Burn CD" button to start the burning and encoding process.
After the burning gets started, TuneClone will automatically convert the music file to MP3. You can open the manager screen to show all the converted music files.
The most important step is to choose the CD burner. Then the software can convert the music files automatically. It is exceedingly easy when you want to batch convert lots of files.
After you get the output MP3 files converted from the Rhapsody music playlist in your Rhapsody, you can now begin to transfer the MP3 files to your iPod with the sync of iTunes.
Thursday, September 11, 2008
Remove iTunes DRM on Windows & Mac
There are many ways to remove DRM protection from iTunes music. On Windows OS, you can remove the DRM from iTunes music using the burn-and-rip method or you can turn to programs like TuneClone and DoubleTwist. On Mac OS X, iMovie is the perfect solution to removing DRM from iTunes music. Besides, freewares like FairGame is also a pretty good choice. So this article is dedicated to introducing several methods of removing the nasty DRM from iTunes music on Windows and Mac OS X. It is divided into the following four parts:
Part 1. Remove DRM from iTunes music on Windows with burn-and-rip method
Part 2. Remove DRM from iTunes music on Windows with TuneClone
Part 3. Remove DRM from iTunes music on Mac OS X with iMovie
Part 4. Remove DRM from iTunes music on Mac OS X with FairGame
Part 1. Remove DRM from iTunes music on Windows with burn-and-rip method
A. Insert a CD-R or CD-RW disc into your CD-ROM drive. You'd better use CD-RW disc as it can be used for more than once.
B. Burn your playlist to make an audio CD. You cannot select the "MP3 CD" option since it requires the protected music files be converted to unprotected MP3 files.
C. After the audio CD is successfully burned, insert the disc into your CD-ROM drive again. Then you can use iTunes or Windows Media Player to import the music tracks on the burned disc to MP3 files.
Part 2. Remove DRM from iTunes music on Windows with TuneClone
A. Download TuneClone from http://www.tuneclone.com/ and install it.
TuneClone is fully compatible with Windows XP and Windows Vista. A virtual CD burner will be installed. This virtual CD-RW will be used to convert music files.
B. Set the default CD burner to TuneClone virtual CD-RW at iTunes.
Click menu "Edit", select menu item "Preferences...", and then select "Advanced Tab". In order to keep the music information about artist, title, etc., the "Include CD Text" option should be checked.
Note: If you are using iTunes 8.0 or above, please skip to this guide about how to remove DRM from iTunes 8 music.

C. Create a playlist, and then add the files you want to convert into the playlist.
D. Click "Burn Disc" button at the bottom right of the main screen of iTunes.
While the burning gets started, TuneClone will automatically convert the music file to MP3, WMA or WAV. You can open the manager screen to show all the converted music files.
The most important step is to choose the cd burner. Then the software can convert the music files automatically. It is exceedingly easy when you want to batch convert lots of files.
Part 3. Remove DRM from iTunes music on Mac OS X with iMovie

In the iMovie window, select the 'Media' tab located between 'Themes' and 'Editing'. You will notice that the top right portion of the interface now offers a media browser. Select the 'Audio' tab and locate the playlist which contains purchased music, or search by artist/title.


Select the DRM-laden song and drag the file from the media browser into the iMovie timeline where it says "Drag audio here to build your project."

In order to export the song, iMovie requires that a visual image be associated with the audio track - iMovie thinks that it is going to be exporting a movie. Simply drag a blank image (or any other image) to the track above the previously imported audio file. Once iMovie has processed the image, select the 'Share…' sub menu item from found inside 'Share' in iMovie's menu bar.

Ensure that 'Expert Settings' is selected in the "Compress movie for:" drop-down menu. Selecting 'Expert Settings' mode will provide the options to export the file as an audio file. Select the 'Share' button.
In the Save as… dialogue, select "Sound to AIFF" in the Export drop-down menu, Choose an appropriate directory for iMovie to export to, title the file, and select 'Save'. Depending on your machine configuration, iMovie will compress and export the movie project as an audio file in 15-40 seconds.

Locate the exported AIFF audio file and drag to your iTunes Library. Right-click on the file and select "Convert Selection to AAC". Once completed, 'Get Info' on the new file, edit meta data, add album art, and trash the originally purchased and AIFF audio files from your iTunes library.
Part 4. Remove DRM from iTunes music on Mac OS X with FairGame
FairGame is freeware to remove DRM protection from iTunes music on Mac OS X. It will convert the DRMed songs you bought on the iTunes Store to an unprotected format (using iTunes default encoder) and keep all the original metadata, lyrics and artwork. FairGame doesn't do lossless DRM stripping. It re-encodes protected AAC files purchased in iTMS into unprotected AAC file using Apple's iMovie software.

What you MUST DO (only once) to get FairGame to work:
Then you can simply:
Don't touch anything and wait until it's done...(FairGame is scripting iMovie's interface to process the songs, don't interfere)
Part 1. Remove DRM from iTunes music on Windows with burn-and-rip method
Part 2. Remove DRM from iTunes music on Windows with TuneClone
Part 3. Remove DRM from iTunes music on Mac OS X with iMovie
Part 4. Remove DRM from iTunes music on Mac OS X with FairGame
Part 1. Remove DRM from iTunes music on Windows with burn-and-rip method
A. Insert a CD-R or CD-RW disc into your CD-ROM drive. You'd better use CD-RW disc as it can be used for more than once.
B. Burn your playlist to make an audio CD. You cannot select the "MP3 CD" option since it requires the protected music files be converted to unprotected MP3 files.
C. After the audio CD is successfully burned, insert the disc into your CD-ROM drive again. Then you can use iTunes or Windows Media Player to import the music tracks on the burned disc to MP3 files.
Part 2. Remove DRM from iTunes music on Windows with TuneClone
A. Download TuneClone from http://www.tuneclone.com/ and install it.
TuneClone is fully compatible with Windows XP and Windows Vista. A virtual CD burner will be installed. This virtual CD-RW will be used to convert music files.
B. Set the default CD burner to TuneClone virtual CD-RW at iTunes.
Click menu "Edit", select menu item "Preferences...", and then select "Advanced Tab". In order to keep the music information about artist, title, etc., the "Include CD Text" option should be checked.
Note: If you are using iTunes 8.0 or above, please skip to this guide about how to remove DRM from iTunes 8 music.
C. Create a playlist, and then add the files you want to convert into the playlist.
D. Click "Burn Disc" button at the bottom right of the main screen of iTunes.
While the burning gets started, TuneClone will automatically convert the music file to MP3, WMA or WAV. You can open the manager screen to show all the converted music files.
The most important step is to choose the cd burner. Then the software can convert the music files automatically. It is exceedingly easy when you want to batch convert lots of files.
Part 3. Remove DRM from iTunes music on Mac OS X with iMovie
In the iMovie window, select the 'Media' tab located between 'Themes' and 'Editing'. You will notice that the top right portion of the interface now offers a media browser. Select the 'Audio' tab and locate the playlist which contains purchased music, or search by artist/title.
Select the DRM-laden song and drag the file from the media browser into the iMovie timeline where it says "Drag audio here to build your project."
In order to export the song, iMovie requires that a visual image be associated with the audio track - iMovie thinks that it is going to be exporting a movie. Simply drag a blank image (or any other image) to the track above the previously imported audio file. Once iMovie has processed the image, select the 'Share…' sub menu item from found inside 'Share' in iMovie's menu bar.
Ensure that 'Expert Settings' is selected in the "Compress movie for:" drop-down menu. Selecting 'Expert Settings' mode will provide the options to export the file as an audio file. Select the 'Share' button.
In the Save as… dialogue, select "Sound to AIFF" in the Export drop-down menu, Choose an appropriate directory for iMovie to export to, title the file, and select 'Save'. Depending on your machine configuration, iMovie will compress and export the movie project as an audio file in 15-40 seconds.
Locate the exported AIFF audio file and drag to your iTunes Library. Right-click on the file and select "Convert Selection to AAC". Once completed, 'Get Info' on the new file, edit meta data, add album art, and trash the originally purchased and AIFF audio files from your iTunes library.
Part 4. Remove DRM from iTunes music on Mac OS X with FairGame
FairGame is freeware to remove DRM protection from iTunes music on Mac OS X. It will convert the DRMed songs you bought on the iTunes Store to an unprotected format (using iTunes default encoder) and keep all the original metadata, lyrics and artwork. FairGame doesn't do lossless DRM stripping. It re-encodes protected AAC files purchased in iTMS into unprotected AAC file using Apple's iMovie software.
What you MUST DO (only once) to get FairGame to work:
- Enable "Access for assistive devices" in the "Universal Access" system preference
- Select "Place clip in Movie Timeline" in the "Import" preference of iMovie HD
Then you can simply:
- Select some songs in iTunes
- Click on the "Process songs" button
Don't touch anything and wait until it's done...(FairGame is scripting iMovie's interface to process the songs, don't interfere)
Thursday, July 31, 2008
TuneClone M4P Converter - remove DRM from iTunes M4P music to MP3 WAV WMA
TuneClone M4P Converter(http://www.tuneclone.com/index.php) is a very easy to use program that converts iTunes M4P music files to plain MP3, WAV and unprotected WMA. Via a user-friendly interface, it is very easy to install and very easy to use.
TuneClone M4P Converter doesn't bypass the DRM. It simulates the burning, ripping and encoding process by installing a virtual CD burner. All you need to do is burn your playlist in your media player software to TuneClone M4P Converter's virtual CD drive, and TuneClone M4P Converter will convert music files in the playlist to MP3, WAV or DRM-free WMA files automatically.
Key features of TuneClone M4P Converter: http://www.tuneclone.com/index.php
1. Within a few clicks, TuneClone M4P Converter lets you remove DRM protection from purchased music by applying the virtual CD burning technology. You can play the converted DRM-free music with media players or any MP3 players including Zune, PSP, BlackBerry, Creative Zen, iriver, SanDisk Sansa, Walkman, Cell Phone (Sony Ericsson, Motorola, Nokia N-series, Samsung Anycall, LG, etc.), Pocket PC, PDA, etc.
2. TuneClone M4P Converter supports almost all music formats your media player software can play and burn, whether they are DRM protected or not, including WMA, M4P, AAC, M4B and M4A. And it can output audio formats such as MP3, WAV and unprotected WMA.
3. TuneClone M4P Converter can easily and quickly convert DRM protected music and various audio files to MP3, WAV and unprotected WMA at very high speed with very nice CD quality.
4. With TuneClone M4P Converter, the converted songs will have no DRM restriction any more.
5. TuneClone M4P Converter is very easy to install and and very easy to use with a very handy and clear user interface.
6. TuneClone M4P Converter can preserve ID3 tags for artist, album, title names, artworks, etc.
7. TuneClone M4P Converter is specially designed for batch converting large song collections. Compared with using real CD-R or CD-RW disc, TuneClone's virtual CD burning uses the maximum writing speed so that your music files can be converted at a very high speed.
TuneClone M4P Converter is available at:http://www.tuneclone.com/tuneclone_setup.exe
Subscribe to:
Posts (Atom)