Showing posts with label DRM free. Show all posts

Wednesday, October 21, 2009

Convert iTunes M4P to MP3 on Mac

You have purchased lots of music from iTunes Store and want to play your music with other mobile devices, such as MP3 Player, MP4 Player, PSP, Mobile Phone? TuneClone Audio Converter for Mac comes to the rescue! It is the iTunes DRM Removal Software that can help you convert DRM protected iTunes M4P to MP3, M4A to MP3, AAC to MP3 on Apple Mac OS X (including Snow Leopard) with CD quality at high speed.


Below is step by step guide that shows you how to convert DRM protected iTunes M4P to MP3 on Mac OS X with TuneClone Audio Converter for Mac.


Step 1. Download TuneClone Audio Converter for Mac from http://mac.tuneclone.com/tuneclone-mac.dmg and run it.


Note: During the startup, a virtual CD burner will be installed, which will be used to convert iTunes music files. The administrator authorization will be needed to install TuneClone virtual CD burner.


Step 2. Open iTunes and burn playlist to TuneClone virtual CD writer


Create a new playlist and add the songs you are going to convert.


Right click the playlist you just created and choose "Burn Playlist to Disc". Or you can click the "Burn Disc" button at the bottom right corner of iTunes interface.


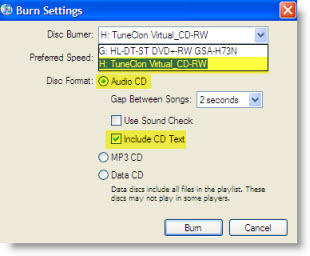
In the pop-up dialog of "Burn Settings", you can make settings as highlighted below:


burn-settings.png


Note: You need to tick the "Include CD Text" option to perserve the music metadata such as name, artist, album names.


Step 3. Start to burn


Click the "Burn" button to start burning. After the burning get started, TuneClone will automatically convert the iTunes music to MP3 files. You can open the TuneClone manager screen to check out the burning status.


burning-status.png


Tip: You can easily get the output MP3 files on your Mac machine by clicking the "Reveal in Finder" button on the manager screen.


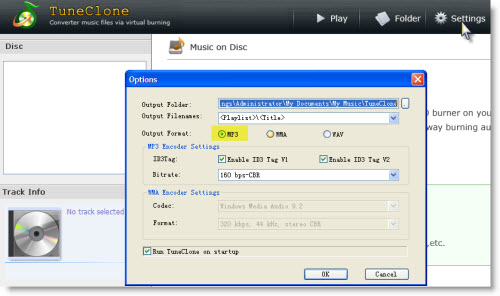
Note: The most important step is to choose the CD burner. Then the software can convert music files automatically. It is especially easy when you want to batch convert lots of files.

Tuesday, September 15, 2009

Transfer iTunes M4P to Zune HD

This guide is going to show you how to remove DRM protection from iTunes music, convert DRM protected iTunes M4P to MP3, M4A to MP3, AAC to MP3 and transfer iTunes music to Zune HD. First, let's take a look at the video/audio formats Zune HD accepts:

Video Support:
WMV
MPEG-4 (MP4/M4V) (.mp4) Part 2 video
H.264 video
DVR-MS

Audio Support:
Windows Media® Audio Standard (WMA) (.wma)
WMA Lossless
Advanced Audio Coding (AAC) (.mp4, .m4a, .m4b, .mov): .m4a and .m4b files without FairPlay DRM
MP3 (.mp3)

So, if you want to play DRM protected iTunes M4P, M4A, AAC music on your Zune HD, you just need to use TuneClone Audio Converter to convert the iTunes music to MP3 format and then transfer the output MP3 to your Zune HD.

Now let's take a look at how it performs to convert the iTunes music to MP3 format for Zune HD using TuneClone Audio Converter:

1. Create a new playlist in iTunes.

2. Add the iTunes songs to the playlist.

3. Launch TuneClone Audio Converter. Click the "Settings" tab. In the pop-up window, you can specify output folder, output file name format, output format, etc for the output files. Note: You can check whether TuneClone virtual CD drive is successfully installed and where it is installed at the bottom left corner of the interface.

iTunes to Zune HD

4. Switch to iTunes. In iTunes, select the playlist you just created and click the "Burn Disc" button.

5. In the pop-up window of "Burn Settings", select "TuneClon Virtual_CD-RW" from the "CD Burner" drop-down list, click the radio button next to "Audio CD" and tick "Include CD Text" option. Click "Burn" to start burning.

iTunes to Zune HD

6. Upon the completion of burning the disc and encoding the music, you can open the TuneClone manager screen to show all the converted music files. To locate the output folder, simply click the "Folder" tab on the interface.

7. After you get the output music files, connect your Zune HD to computer via the USB cable, drag and drop the converted MP3 files to the Zune Software, then you can sync the iTunes M4P music to Zune HD with the help of Zune Software at ease.

Extracted from http://www.tuneclone.com/transfer-itunes-music-to-zune-hd.php

Thursday, September 03, 2009

Play M4P on HTC Touch Pro

This guide is going to show you how to remove DRM from iTunes music, convert DRM protected iTunes M4P to MP3 and sync iTunes music to HTC Touch Pro. First, let's take a look at the multimedia support of HTC Touch Pro:

Video Playback: Windows Media Player
Music Player: MP3, AAC, AAC+, WMA, WAV, Windows Media Player

So, if you want to play iTunes M4P, M4A, AAC music on your HTC Touch Pro, you just need to use TuneClone Audio Converter to help you convert the iTunes music to HTC Touch Pro compatible format and then transfer the output files to your HTC Touch Pro.


Now let's take a look at how it performs to convert the iTunes music to HTC Touch Pro compatible format using TuneClone Audio Converter:

1. Create a new playlist in iTunes.

2. Add the iTunes songs to the playlist.

3. Launch TuneClone Audio Converter. Click the "Settings" tab. In the pop-up window, you can specify output folder, output file name format, output format, etc for the output files. Note: You can check whether TuneClone virtual CD drive is successfully installed and where it is installed at the bottom left corner of the interface.


4. Switch to iTunes. In iTunes, select the playlist you just created and click the "Burn Disc" button.

5. In the pop-up window of "Burn Settings", select "TuneClon Virtual_CD-RW" from the "CD Burner" drop-down list, click the radio button next to "Audio CD" and tick "Include CD Text" option. Click "Burn" to start burning.


6. Upon the completion of burning the disc and encoding the music, you can open the TuneClone manager screen to show all the converted music files. To locate the output folder, simply click the "Folder" tab on the interface.

After you get the output music files, connect your HTC Touch HD or Touch Pro to computer via the USB cable, darg and drop the converted music to the music folder, then you can play the iTunes M4P music on your HTC Touch HD, Touch Pro at ease.

Extracted from http://www.tuneclone.com/play-itunes-m4p-on-htc-touch-pro.php

Wednesday, June 10, 2009

Put iTunes M4P onto Limewire Napster Rhapsody

The following tutorial will show you how to remove DRM from iTunes protected AAC (M4P) music and convert M4P to (DRM free) WMA/MP3 so as to put iTunes M4P music onto Rhapsody, Napster, Limewire for syncing to a lot more mobile players.


Why Put iTunes M4P music onto Rhapsody Napster Limewire?


When you purchase music from iTunes Store, you actually get DRM protected content (in protected AAC or M4P format), which you will not be able to play on MP3/MP4 players and other non-Apple mobile players. You cannot directly transfer the M4P files to Rhapsody, Napster, Limewire, either. In such case, the option is to burn those tracks to an audio CD and then rip them once again to your computer hard drive wherein the DRM will be removed and you will get the tracks in (DRM free) MP3 or WMA format. After this you will be able to transfer them to Limewire, Rhapsody or Napster.

In case you have purchased a great amount of music from iTunes Store, you can go ahead and use TuneClone M4P to MP3 Converter which acts as a Virtual CD-ROM drive on your PC and lets you remove the DRM element without having to waste actual CD's, with the music ID3 tags info well preserved.


Step by Step: Burn and Rip iTunes M4P Music for Limewire/Rhapsody/Napster?


1. Insert a CD-R or CD-RW disc into your CD-ROM drive.

2. Burn the iTunes M4P playlist to make an audio CD. You cannot select the "MP3 CD" option since it requires the DRM protected iTunes M4P files be converted to MP3 or WMA files for Rhapsody, Napster, Limewire.

3. After the audio CD is successfully burned, insert the disc into your CD-ROM drive again. Then you can use iTunes or Windows Media Player to import the music tracks on the burned disc as MP3 or WMA files.


Step by Step: Convert iTunes M4P Music for Rhapsody/Napster/Limewire with TuneClone M4P to MP3 Converter


1. Create a new playlist in iTunes.

2. Add the M4P songs to the playlist.

3. Launch TuneClone M4P to MP3 Converter. Click the "Settings" tab. In the pop-up window, you can specify output folder, output file name format, output format (choose MP3 or WMA), etc for the output files. Note: You can check whether TuneClone virtual CD drive is successfully installed and where it is installed in the bottom left corner of the interface.


4. Switch to iTunes. In iTunes, click the "Burn Disc" button.

5. In the pop-up window of "Burn Settings", select "TuneClon Virtual_CD-RW" from the "CD Burner" drop-down list, click the radio button next to "Audio CD" and tick "Include CD Text" option. Click "Burn" to start burning.


6. Upon the completion of burning the disc and encoding the music, you can open the TuneClone manager screen to show all the converted music files. To locate the output folder, simply click the "Folder" tab on the interface.

Thursday, January 08, 2009

How to convert iTunes Plus to MP3?

The other day Apple announced that it was making about 80% of the iTunes store DRM free, with the remaining 20% to follow shortly. DRM-free iTunes means that in theory you should be able move your music to other computers and devices easily...

But... iTunes Plus DRM-free music comes in .m4a format which is based on the MPEG-4 part 14 standard. Problem is, far more devices don't recognize what to do with .m4a than do (and its video sibling, .m4v). MP3 is a far more popular format.

So, can you convert .m4a files into.mp3 files? Yes you can, and you can do it all from within iTunes (iTunes 8)! Here's how:

1. Click on Edit -> Preferences.... From the General tab click on Import Settings... button.


2. Change the Import Using drop down box to MP3 Encoder.

3. From the Settings drop down box select Custom... and choose a Stereo Bit Rate of 256Kbps.


4. Click OK, OK and OK.

5. Now find a file that you want to convert, right-click on it and select Create MP3 Version and an MP3 copy will be created.

Note that you'll have now both versions of the song in your library, so you’ll have to do a little housekeeping.

Note that if you want to upgrade your previously purchased iTunes tracks to DRM free, you need to pay 30 cents per song. You can't pick and choose which tracks to upgrade. Start by going to the iTunes Store home page, and clicking on "Upgrade My Library" under the "Quick Links" heading. Once there, you'll see a list of all the songs and albums that are available for upgrading, with a price next to each. But the important number to look at is the price next to the buy button, since that's how much it'll cost to upgrade your library.

So if have an extensive music collection with many songs (i.e. 500 songs) purchased from iTunes and wanted to get them freed from DRM protection, you will have to pay USD150 for the upgrade. And in order to listen to them with your MP3 player or mobile phone music player, you still need a further step - convert the AAC music to MP3 one by one (as the steps show above). It not only messes your iTunes library up but also costs you a great deal of time and money. Therefore, if you really want to play the previously purchased music tracks from iTunes Store with MP3 players or mobile phone music players, you just need to get TuneClone Audio Converter to help to remove the iTunes DRM protection and convert the iTunes music to the popular MP3 format. Also, if you get iTunes Plus DRM-free music files and want to play them with the MP3 players or mobile phone music players incompatible with Apple AAC format, you can still use TuneClone to turn them into MP3 format, saving the time to create MP3 version for the songs one by one.