TuneClone Audio Converter is a unique audio converter application. Compared with other audio converter programs, TuneClone converts music files via virtual CD drive. All you need to do is burn your playlist to TuneClone's virtual CD drive by using your media player software, such as iTunes, Windows Media Player, RealPlayer, WinAMP, Napster, Rhapsody, etc. The key step to use TuneClone is to select TuneClone's virtual CD-RW drive as CD burner. Your music files will be automatically converted during the burning and encoding process.
Below are the detailed tutorial about how to burn RealPlayer music to MP3 using TuneClone's virtual CD burner:
1. Download TuneClone from http://www.tuneclone.com/index.php and install it.
TuneClone is fully compatible with Windows XP, Vista. A virtual CD burner will be installed. This virtual CD-RW will be used to convert music files.
2. Launch RealPlayer and Click the "Burn/Transfer" button. Change the "Current Burner/Device" to "Audio CD Burner".
Click the "Edit Options..." button and you will see the dialogue window below:
Click the "Advanced Options..." button. In the following dialogue window, change the default CD burner to "TuneClon Virtual_CD-RW".
Step 4. Start burning
Back to the main screen, add music files to the list and click "Burn Your CD" button.
After the burning gets started, TuneClone will automatically convert the music file to MP3. You can open the manager screen to show all the converted music files.
The most important step is to choose the CD burner. Then the software can convert the music files automatically. It is exceedingly easy when you want to batch convert lots of files.
Unlock iTunes Music, Free iTunes Music, Remove iTunes DRM, Strip iTunes DRM
Thursday, July 31, 2008
TuneClone M4P Converter - remove DRM from iTunes M4P music to MP3 WAV WMA
TuneClone M4P Converter(http://www.tuneclone.com/index.php) is a very easy to use program that converts iTunes M4P music files to plain MP3, WAV and unprotected WMA. Via a user-friendly interface, it is very easy to install and very easy to use.
TuneClone M4P Converter doesn't bypass the DRM. It simulates the burning, ripping and encoding process by installing a virtual CD burner. All you need to do is burn your playlist in your media player software to TuneClone M4P Converter's virtual CD drive, and TuneClone M4P Converter will convert music files in the playlist to MP3, WAV or DRM-free WMA files automatically.
Key features of TuneClone M4P Converter: http://www.tuneclone.com/index.php
1. Within a few clicks, TuneClone M4P Converter lets you remove DRM protection from purchased music by applying the virtual CD burning technology. You can play the converted DRM-free music with media players or any MP3 players including Zune, PSP, BlackBerry, Creative Zen, iriver, SanDisk Sansa, Walkman, Cell Phone (Sony Ericsson, Motorola, Nokia N-series, Samsung Anycall, LG, etc.), Pocket PC, PDA, etc.
2. TuneClone M4P Converter supports almost all music formats your media player software can play and burn, whether they are DRM protected or not, including WMA, M4P, AAC, M4B and M4A. And it can output audio formats such as MP3, WAV and unprotected WMA.
3. TuneClone M4P Converter can easily and quickly convert DRM protected music and various audio files to MP3, WAV and unprotected WMA at very high speed with very nice CD quality.
4. With TuneClone M4P Converter, the converted songs will have no DRM restriction any more.
5. TuneClone M4P Converter is very easy to install and and very easy to use with a very handy and clear user interface.
6. TuneClone M4P Converter can preserve ID3 tags for artist, album, title names, artworks, etc.
7. TuneClone M4P Converter is specially designed for batch converting large song collections. Compared with using real CD-R or CD-RW disc, TuneClone's virtual CD burning uses the maximum writing speed so that your music files can be converted at a very high speed.
TuneClone M4P Converter is available at:http://www.tuneclone.com/tuneclone_setup.exe
Sunday, July 27, 2008
How to share iTunes DRM music with your Facebook friends
Facebook is a social utility that connects people with friends and others who work, study and live around them. People use Facebook to keep up with friends, upload an unlimited number of photos, share links and videos, and learn more about the people they meet.
Facebook offers an application called "Twist me!" to help Facebook fans share music with their friends. Below is the brief steps:
First, visit Facebook website and add the "Twist me!" Application to your profile.
Second, click "Twist me!" from the "Applications" list and click "Next" to import the music files from your local PC. Of course, you can also import videos and images. The supporting formats are various. Here I focus on music. You can add a maximum of 8 audio files here. What's more, you can leave a message to your friends accompanying the music files.
Third, choose your friends to send the music files to.
It is very easy to share music files with your Facebook friends. However, we always have very classic music on our iTunes accounts and are willing to share them with our Facebook friends. Here comes the headache! The music files under the iTune account are DRM protected. So how to remove the DRM from the protected iTunes music files and output them as Facebook supported unprotected music files?
The program called TuneClone I talked about in my previous post How to convert iTunes M4P to MP3 with TuneClone comes to the rescue. It can be used to batch convert DRM protected iTunes M4P music to MP3. This program automatically generates a virtual CD burner for converting the music files. Compared with using real disc, it is much faster. Moreover, this cute program can keep the information about artist, title and album intact. It is a very good application for iTunes users who have hundreds of M4P files ready to be converted and DRM removed.
Thursday, July 17, 2008
How to convert protected WMA to MP3 with TuneClone
TuneClone Audio Converter is a unique audio converter program. Compared with other audio converter programs, TuneClone converts music files via a virtual CD driver. All you need to do is burn your playlist to TuneClone's virtual CD drive by using your media player software, such as iTunes, Windows Media Player, RealPlayer, WinAMP, etc. The key step to use TuneClone is to select TuneClone's virtual CD-RW drive as CD burner and then burn your playlist. Your music files will be automatically converted during the burning and ripping process.
In my previous post, I talked about how to burn DRM protected iTunes M4P music to MP3 by using iTunes. Today, with the help of the same program TuneClone, I'd like to elaborate on how to convert protected WMA to MP3 using TuneClone's virtual CD drive. Below are the detailed steps:
1. Download TuneClone from http://www.tuneclone.com/tuneclone_setup.exe and install it.
TuneClone is fully compatible with Windows XP and Windows Vista. A virtual CD burner will be installed. This virtual CD-RW will be used to convert music files.
2. Set "Burn" option at Windows Media Player
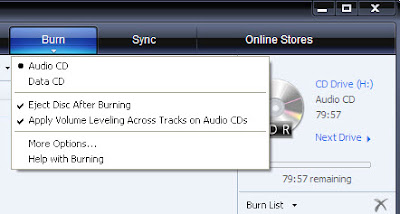
Launch Windows Media Player and click the "Burn" button in the main window to enable the burning function of Windows Media Player. From the drop-down list, please tick "Audio CD" option if it is currently unchecked.
3. Select the TuneClone's Virtual CD burner
Click the "Next Drive" button to select TuneClone's Virtual CD Burner.
4. Start to burn
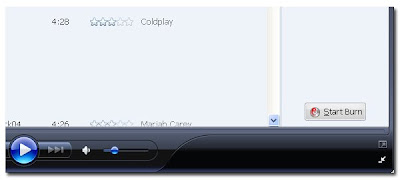
Drag your music files to the "Burn List", and click the "Start Burn" button to burn the playlist.
After the burning gets started, TuneClone will automatically convert the music file to MP3. You can open the manager screen to show all the converted music files.
The most important step is to choose the cd burner. Then the software can convert the music files automatically. It is exceedingly easy when you want to batch convert lots of files.
Note: Under Windows Vista, Windows Media Player 11 may not able to choose the TuneClone's virtual CD burner.
In my previous post, I talked about how to burn DRM protected iTunes M4P music to MP3 by using iTunes. Today, with the help of the same program TuneClone, I'd like to elaborate on how to convert protected WMA to MP3 using TuneClone's virtual CD drive. Below are the detailed steps:
1. Download TuneClone from http://www.tuneclone.com/tuneclone_setup.exe and install it.
TuneClone is fully compatible with Windows XP and Windows Vista. A virtual CD burner will be installed. This virtual CD-RW will be used to convert music files.
2. Set "Burn" option at Windows Media Player
Launch Windows Media Player and click the "Burn" button in the main window to enable the burning function of Windows Media Player. From the drop-down list, please tick "Audio CD" option if it is currently unchecked.
3. Select the TuneClone's Virtual CD burner
Click the "Next Drive" button to select TuneClone's Virtual CD Burner.
4. Start to burn
Drag your music files to the "Burn List", and click the "Start Burn" button to burn the playlist.
After the burning gets started, TuneClone will automatically convert the music file to MP3. You can open the manager screen to show all the converted music files.
The most important step is to choose the cd burner. Then the software can convert the music files automatically. It is exceedingly easy when you want to batch convert lots of files.
Note: Under Windows Vista, Windows Media Player 11 may not able to choose the TuneClone's virtual CD burner.
Tuesday, July 15, 2008
How to convert iTunes M4P to MP3 with TuneClone
TuneClone Audio Converter is the software you are looking for if you have a big collection of iTunes M4P music files to be converted to MP3. It automatically generates a virtual CD drive and simulates the burning and ripping process. All you need to do is install TuneClone and then burn your playlist to TuneClone virtual CD burner. And TuneClone will directly convert the iTunes M4P music to MP3. It is very fast and all the music information about artist, album and title will be preserved perfectly.
Note: If you are using iTunes 8.0 or above, please skip to http://itunestomp3.blogspot.com/2008/09/updated-how-to-convert-itunes-protected.html
1. Download TuneClone from http://www.tuneclone.com and install it.
TuneClone Audio Converter is fully compatible with Windows XP and Vista. A virtual CD Burner will be installed. This virtual CD-RW will be used to convert music files.
2. Set the default CD Burner to TuneClon CD-RW at iTunes.
Click menu "Edit", select menu item "Preferences...", and then select "Advanced" tab. In order to keep the music metadata, the "Include CD Text" option should be checked.
3. Create a playlist, and then add the files you want to convert into the playlist.
4. Click Burn Disc button at the bottom right of the main screen of iTunes.
While the burning gets started, TuneClone will automatically convert the music file to MP3. You can open the manager screen to show all the converted music files.
The most important step is to choose the cd burner. Then TuneClone will convert the music files automatically. It is exceedingly easy when you want to batch convert lots of M4P files.
Tuesday, July 08, 2008
How to convert iTunes protected AAC M4P to MP3
The music files you purchased from iTunes store areunder DRM protection. You cannot play them on your own mobile devices other than iPod and iPhone. You cannot directly convert the DRM protected AAC (M4P) to MP3 with iTunes media player, either. However you can burn the M4P music files to CD-R or CD-RW disc to make an audio CD and then use some CD ripper software to convert the audio CD track back to MP3. iTunes allows you to burn the protected AAC music files to CD-R or CD-RW disc to make a standard audio CD. If you have only a few music files, you can use the method below:
1. Insert a CD-R or CD-RW disc into your CD-ROM drive. You'd better use CD-RW disc as it can be used for more than once.
2. Burn your playlist to make an audio CD. You cannot select the "MP3 CD" option since it requires the protected music files be converted to unprotected MP3 files.
3. After the audio CD is successfully burned, insert the disc into your CD-ROM drive again. Then you can use iTunes to import the music tracks on the burned disc to MP3 files.
4. Copy the MP3 files to media players such as cell phone, Zune, BlackBerry, PSP, Creative Zen, etc.
These four steps seem very simple, however, it is a time consuming process if you have a library of M4P music files ready to be converted. Moreover, the information about the music files like title, artist and album will be lost after burning and ripping back to MP3 files.
TuneClone is the software you are looking for if you have a big collection of iTunes M4P music to be converted to MP3. It automatically generates a virtual CD drive and simulates the burning and ripping process. All you need to do is install TuneClone and then burn your playlist to TuneClone virtual CD burner. And TuneClone will directly convert the M4P files to MP3. It is very fast and the music metadata information about artist, album and title will be well preserved.
Subscribe to:
Posts (Atom)