1. Insert a CD-R or CD-RW disc into your CD-ROM drive.
2. Burn your playlist to make an audio CD. You cannot select the "MP3 CD" option since it requires the DRM protected iTunes music files be converted to unprotected MP3, WMA or WAV files.
3. After the audio CD is successfully burned, insert the disc into your CD-ROM drive again. Then you can use iTunes to import the music tracks on the burned disc as MP3, WMA or WAV files.
And the method I am going to introduce does the same exact thing but you will not need a CD-RW disc, a CD ROM drive, or even need to burn anything! It's that simple. Let's show you how to perform this.
We are going to be using a program called TuneClone M4P Converter. TuneClone M4P Converter is basically a program that acts as a virtual CD drive that allows you "burn" MP3 from iTunes and "rip" it. TuneClone "lies" to your computer saying that you have a CD-RW drive that it will burn to (like Alchohol 120%). You can use this to move your library of M4P DRM protected music to the MP3 format that you can use on any player out there worth its salt. This is a useful tool for anyone looking to break their relationship with the iPod. The best part is that it maintains all of the music file's metadata. Below is the step by step tutorial that shows how it works:
- Create a new playlist in iTunes.
- Add the protected songs to your playlist. Since iTunes burns the protected music with TuneClone virtual CD drive, there is no limit as to music length so long as you have enough hard drive space.
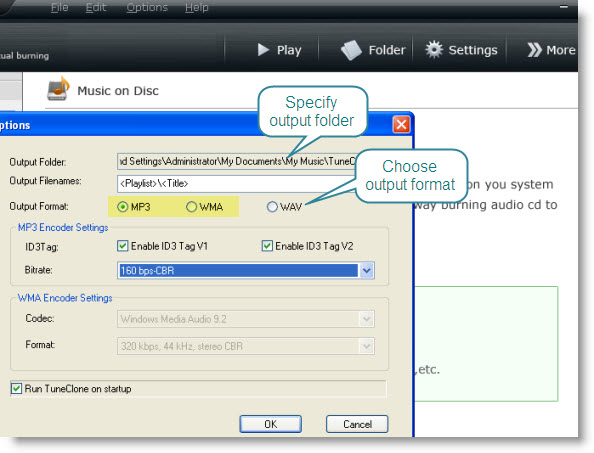
- Launch TuneClone M4P Converter. Click the "Settings" tab. In the pop-up window, you can specify output folder, output file name format, output format (WMA, MP3, WAV), etc for the output files. Note: You can check whether TuneClone virtual CD drive is successfully installed and where it is installed in the bottom left corner of the interface.
- In iTunes, click the "Burn Disc" button.
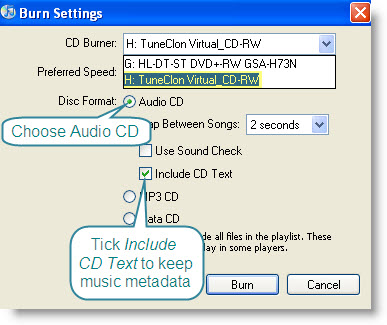
- In the pop-up window of "Burn Settings", select "TuneClon Virtual_CD-RW" from the "CD Burner" drop-down list, click the radio button next to "Audio CD" and tick "Include CD Text" option. Click "Burn" to start burning.
- Upon the completion of burning the disc and encoding the music, you can open the TuneClone manager screen to show all the converted music files. To locate the output folder, simply click the "Folder" tab on the interface.


No comments:
Post a Comment