- Create a new playlist in iTunes.
- Add the protected songs to your playlist until you have 72 minutes of music.
- Click the "Burn Disc" button.
- Click the radio button next to "Audio CD" and tick "Include CD Text" option.
- Upon completion of burning the disc, rip the songs to MP3 using Windows Media Player.
- Open the Zune software and sync the newly created MP3's to your Zune device.
Alternatively, you can use TuneClone Audio Converter. It automatically generates a virtual CD-ROM drive during the installation. The virtual CD drive tricks your PC into believing that you are burning a CD. Therefore, the DRM protection is removed without wasting a CD and the speed is very fast. Below are the steps:
- Create a new playlist in iTunes.
- Add the protected songs to your playlist. Since iTunes burns the protected music with TuneClone virtual CD drive, there is no limit as to music length so long as you have enough hard drive space.
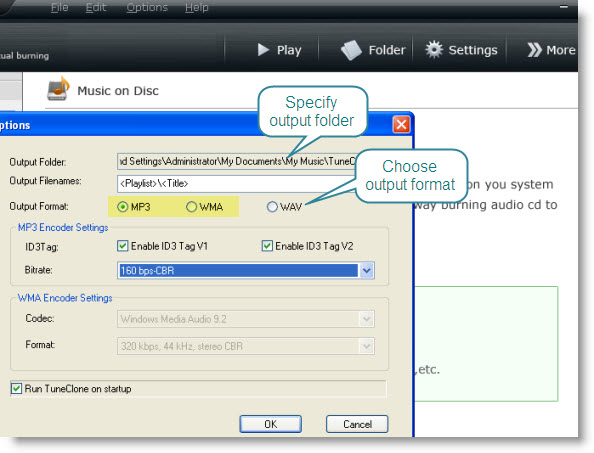
- Launch TuneClone. Click the "Settings" tab. In the pop-up window, you can specify output folder, output file name format, output format (Here we can choose MP3 or WMA since Zune accepts MP3 and WMA music), etc. for the output files. Note: You can check whether TuneClone virtual CD drive is successfully installed and where it is installed in the bottom left corner of the interface.
- In iTunes, click the "Burn Disc" button.
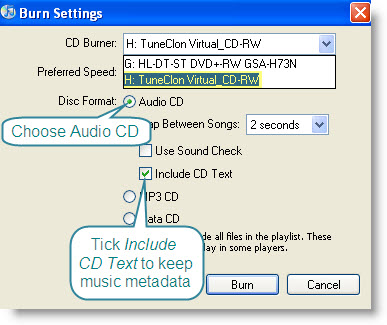
- In the pop-up window of "Burn Settings", select "TuneClon Virtual_CD-RW" from the "CD Burner" drop-down list, click the radio button next to "Audio CD" and tick "Include CD Text" option. Click "Burn" to start burning.
- Upon the completion of burning the disc and encoding the music, you can open the TuneClone manager screen to show all the converted music files. To locate the output folder, simply click the "Folder" tab on the interface.
- Open the Zune software and sync the music in the output folder to your Zune device.
Done.
2 comments:
If you want to watch DVD movies, video files and YouTube videos on your Zune, you can get all-in-one Clone2Go DVD to Zune Converter, which combines the DVD ripper, video converter and YouTube downloader features into one single program.
As to DVD and video tools, I'd like to recommend Clone2Go DVD Ripper, as it combines the following features into one program:
1. Rip DVD to video/audio
2. Convert video to video/audio
3. Download YouTube video
4. Convert YouTube video to video/audio
Below is the step by step user guide: http://www.clone2go.com/tutorials/dvd-ripper.php
Post a Comment