Showing posts with label itunes. Show all posts

Thursday, December 30, 2010

Sync iTunes music m4p with Windows Phone 7

"I have 5.81 GB (approximately 1200 songs) in my iTunes. How do I transfer ALL of those songs to my Windows Phone 7? I want EVERY song I have in my iTunes on my Windows Phone 7. What is the best way to go about this?"

If you want to play iTunes music M4P, M4A, AAC on your Windows Phone 7, you just need to use some software to convert iTunes music to Windows Phone 7 compatible format and then transfer the output files to your Windows Phone 7. The following guide is going to show you how to remove DRM copy protection from iTunes music, convert DRM iTunes music M4P to MP3, M4A to MP3, AAC to MP3 and sync iTunes music to Windows Phone 7 using TuneClone Audio Converter.

iTunes music to Windows Phone 7

1. Create a new playlist in iTunes.

2. Add the iTunes songs to the playlist.

3. Launch TuneClone Audio Converter. Click the "Settings" tab. In the pop-up window, you can specify output folder, output file name format, output format, etc for the output files. Note: You can check whether TuneClone virtual CD drive is successfully installed and where it is installed at the bottom left corner of the interface.

iTunes music to Windows Phone 7

4. Switch to iTunes. In iTunes, Right click the playlist you just created and choose "Burn Playlist to Disc".

5. In the pop-up window of "Burn Settings", select "TuneClon Virtual_CD-RW" from the "CD Burner" drop-down list, click the radio button next to "Audio CD" and tick "Include CD Text" option. Click "Burn" to start burning.

iTunes music to Windows Phone 7

6. Upon the completion of burning the disc and encoding the music, you can open the TuneClone manager screen to show all the converted music files. To locate the output folder, simply click the "Folder" tab on the interface.

After you get the output music files, connect your Windows Phone 7 to computer via the USB cable, drag and drop the converted music to the music folder, then you can play the iTunes M4P music on your Windows Phone 7 at ease.

Tuesday, September 15, 2009

Transfer iTunes M4P to Zune HD

This guide is going to show you how to remove DRM protection from iTunes music, convert DRM protected iTunes M4P to MP3, M4A to MP3, AAC to MP3 and transfer iTunes music to Zune HD. First, let's take a look at the video/audio formats Zune HD accepts:

Video Support:
WMV
MPEG-4 (MP4/M4V) (.mp4) Part 2 video
H.264 video
DVR-MS

Audio Support:
Windows Media® Audio Standard (WMA) (.wma)
WMA Lossless
Advanced Audio Coding (AAC) (.mp4, .m4a, .m4b, .mov): .m4a and .m4b files without FairPlay DRM
MP3 (.mp3)

So, if you want to play DRM protected iTunes M4P, M4A, AAC music on your Zune HD, you just need to use TuneClone Audio Converter to convert the iTunes music to MP3 format and then transfer the output MP3 to your Zune HD.

Now let's take a look at how it performs to convert the iTunes music to MP3 format for Zune HD using TuneClone Audio Converter:

1. Create a new playlist in iTunes.

2. Add the iTunes songs to the playlist.

3. Launch TuneClone Audio Converter. Click the "Settings" tab. In the pop-up window, you can specify output folder, output file name format, output format, etc for the output files. Note: You can check whether TuneClone virtual CD drive is successfully installed and where it is installed at the bottom left corner of the interface.

iTunes to Zune HD

4. Switch to iTunes. In iTunes, select the playlist you just created and click the "Burn Disc" button.

5. In the pop-up window of "Burn Settings", select "TuneClon Virtual_CD-RW" from the "CD Burner" drop-down list, click the radio button next to "Audio CD" and tick "Include CD Text" option. Click "Burn" to start burning.

iTunes to Zune HD

6. Upon the completion of burning the disc and encoding the music, you can open the TuneClone manager screen to show all the converted music files. To locate the output folder, simply click the "Folder" tab on the interface.

7. After you get the output music files, connect your Zune HD to computer via the USB cable, drag and drop the converted MP3 files to the Zune Software, then you can sync the iTunes M4P music to Zune HD with the help of Zune Software at ease.

Extracted from http://www.tuneclone.com/transfer-itunes-music-to-zune-hd.php

Thursday, August 20, 2009

How to remove DRM from Rhapsody music for iPod iPhone

Music purchased from Rhapsody is under DRM protection, which stops customers from playing the downloaded music with other incompatible devices like Apple iPod and Microsoft Zune. If you don't continue to pay, you won't keep the music when the subscription expires. As we all know, iPod is one of the most popular and successful MP3 players. iPod owners can purchase various music songs from iTunes Store and listen to them with their iPods. However, if you prefer Rhapsody and find some songs in Rhapsody that are unavailable in iTunes store, yet you do want to enjoy these songs with your new iPod, you are meeting the headache of Rhapsody being incompatible with iPod. So the following tutorial should be the solution.

The tools you will need:

TuneClone Audio Converter
Rhapsody Software
iPod
iTunes Library

1. Make settings in TuneClone Audio Converter

Download TuneClone (fully compatible with Windows XP and Windows Vista) from http://www.tuneclone.com and install it. After launching TuneClone, click the "Settings" button. In the pop-up dialog of "Options", you can specify the "Output Folder", "Output Filenames", "Output Format" (here we choose MP3), etc. for the output files.

Tip: You can get the output protection removed MP3 music folder by clicking the "Folder" button after the whole process.

transfer rhapsody music to itunes

2. Create a new playlist in Rhapsody

In the center left panel of Rhapsody, navigate to "Playlist". Then in the bottom left corner, click "New" to create a new playlist.

Click "File" and select "New Playlist" to create a new playlist in Rhapsody.

Drag and drop the music you are ready to burn to the new playlist from Rhapsody Library.

transfer rhapsody music to itunes

3. Make CD burning settings in Rhapsody

Click "Tools" and select "Preference..." from the drop-down list. Click "CD Burning" from the list in the left panel. In the "CD Burner Options", choose TuneClone virtual CD drive as preferred CD burner.

transfer rhapsody music to itunes

4. Start to burn

Click the "Burn CD" button to start the burning and encoding process.

After the burning gets started, TuneClone will automatically convert the music file to MP3. You can open the manager screen to show all the converted music files.

transfer rhapsody music to itunes

The most important step is to choose the CD burner. Then the software can convert the music files automatically. It is exceedingly easy when you want to batch convert lots of files.

After you get the output MP3 files converted from the Rhapsody music playlist in your Rhapsody, you can now begin to transfer the MP3 files to your iPod with the sync of iTunes.

Wednesday, June 10, 2009

How to add music to iPhone

The following article focuses on different channels of listening to music on iPod and iPhone. To enjoy music on iPod and iPhone, you first need to get the music in iPod/iPhone format onto iTunes library and then sync the music to your iPod/iPhone.

Channel 1. Buy music from iTunes Store for iPod/iPhone

To find and buy music from the iTunes Store, just click on the "iTunes Store" link under "Store" in the left column of iTunes. Once in, you're greeted with the iTunes Store interface, with links on the left-hand side that take you to Music, Movies, TV Shows, Music Videos, Audiobooks, and Podcasts. After you've chosen a song or album to buy, just click on the "Buy Song" or "Buy Album" button for that selection.


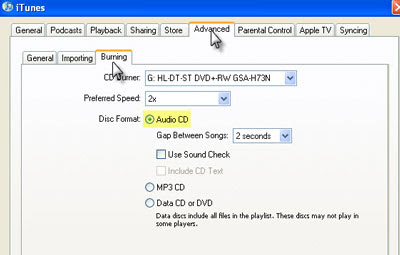
Channel 2. Import your CDs into iTunes for iPod/iPhone

If you own a few CDs, you can import them into iTunes for your iPod/iPhone. Since you've already spent money on this music, there's no reason why you should have to buy it all over again just to get the songs into iTunes. Apple made it simple to rip a CD to your library.


By default, iTunes rips songs to AAC format, and although AAC is a very high-quality format, it isn't as widely-supported as the ubiquitous MP3 format, which enjoys support from virtually every digital music player known to man, including iPod and iPhone. To ensure greater portability of your music (and prevent you from feeling locked into one product just because you've ripped all your music in one format), I suggest ripping your CDs as MP3s. To do so, go to Edit -> Preferences. In the General tab, click the Import Settings... button. In the pop up dialog window of Import Settings, select MP3 Encoder from the Import Using dropdown menu and Higher Quality (192 kbps) from the Setting dropdown.


There are many other subscription music services you may already be subscribed to, like Rhapsody, Napster, and Zune Marketplace, which let you buy or rent tracks. But the songs that come from these stores use a Digital Rights Management (DRM) scheme that is incompatible with iTunes and the iPod/iPhone. In other words, these songs are protected from being played in software and hardware music players that don't support their particular standard (just like non-iPod music players can't play most music from the iTunes Music Store). There is software tool called 
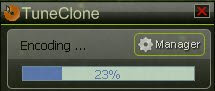
TuneClone Audio Converter that claims to be able to remove DRM from Rhapsody, Napster and Zune Marketplace and convert the DRM protected music to MP3, WAV and unprotected WMA with a virtual CD drive. So if you want to transfer your Rhapsody/Napster/Zune music to iTunes for your iPod/iPhone, you mnay download this piece of software to help you get the music DRM removed and converted to MP3 for a try.


However, the online digital music store eMusic sells DRM-free MP3s, and there are many websites where you can download free and legal MP3s that don't contain DRM and can be imported into the iPhone easily.

Channel 3. Import MP3s into iTunes for iPod/iPhone

Once you've downloaded MP3s onto your computer, it's easy to import them into iTunes. First make a new playlist by going to the "File" menu and clicking "New Playlist" and naming it anything you like. Select that playlist in iTunes, then drag your MP3s from your hard drive into the right-hand pane. iTunes will start importing your music and populating the playlist with songs. After it's done, you're free to play back the songs or sync them to your iPod/iPhone just like all the rest of your library.

Channel 4. Import WMAs into iTunes for iPod/iPhone

Importing unprotected WMA files is just like importing MP3 files, but requires one additional step. With WMA files, iTunes will actually transcode the songs and change the format from WMA to whatever default audio encoder you've set in the iTunes Preferences. It's not necessary to know the difference between WMAs, MP3s, and AACs, but you should know that when you import WMAs, your original files are untouched and a new file is created.

Note: For importing DRM protected WMA files into iTunes, you will need to remove the DRM first. I've found TuneClone Audio Converter can also be used to convert DRM protected WMA to MP3. There's a tutorial on its website that details how to convert protected WMA to MP3 for iPod. I've followed it step by step to have a try. It worked great as a whole except that it didn't preserve the music metadata very well though the tutorial offered a reluctant solution.

Tuesday, April 28, 2009

Play iTunes M4P on Creative Zen

Zen is the first Creative player that supports unprotected AAC format, so you can enjoy up to 8,0001 of your favorite CD tracks that you've ripped through iTunes software. Zen also supports iTunes Plus tracks from the iTunes store, in addition to MP3 and WMA music tracks. It is also compatible with music subscription services such as Napster To Go and Rhapsody.

However, as the music purchased from iTunes Store is encrypted with DRM, you cannot directly play it on your Creative Zen. iTunes allows you to burn the protected AAC(M4P) files to CD-R or CD-RW disc to make a standard audio CD:

1. Insert a CD-R or CD-RW disc into your CD-ROM drive.
2. Burn your playlist to make an audio CD.
3. After the audio CD is successfully burned, insert the disc into your CD-ROM drive again. Then you can use iTunes or Windows Media Player to import the music tracks on the burned disc as MP3 or WMA files.

Or you can get some software to help you. I use TuneClone M4P Converter to do this. Though not free, it is very well worth a try. It generates a virtual CD drive to help to remove DRM from iTunes and convert the M4P music to MP3 or unprotected WMA format, which is compatible with your Creative Zen.

Play iTunes on Creative Zen

Here is the tutorial as to how to use TuneClone to convert iTunes M4P to MP3.

Tuesday, December 23, 2008

Transfer iTunes to BlackBerry Storm

"With a unique touch screen and cutting-edge multimedia capabilities, the BlackBerry Storm smartphone makes a great impression as you travel across town or to almost any corner of the world."

One of the great new features I am starting to enjoy on my BlackBerry Storm is the ability for it to play multimedia files and specifically audio (music).

First let's take a look at the video and audio formats supported by BlackBerry Storm:

Video format support: MPEG4 H.263, MPEG4 Part 2 Simple Profile, H.264, WMV
Audio format support: MP3, AAC, AAC+, eAAC+, WMA, WMA ProPlus

Basically, when you buy music from iTunes, it comes with a copyright protection called DRM. These DRM-protected songs are locked so that they only work with Apple MP3 players. That means that if you have a BlackBerry Storm, you cannot use iTunes music.

So, what is the solution? You have to burn a CD. When you do this, the DRM is removed (because the music is converted to a non-DRM-compatible media). After you burn the CD, you can rip it to your PC as an MP3 file which no longer has DRM.

Alternatively, you can use TuneClone. TuneClone makes a virtual CD-ROM drive, tricking your PC into believing that you are burning a CD. Therefore, the DRM is removed without wasting a CD.

Here is a link to a tutorial using TuneClone and iTunes 8:
http://www.tuneclone.com/itunes8-m4p-to-mp3.php


After you get the output MP3 files, you can now begin to transfer them to your BlackBerry Storm:

1. Connect your BlackBerry to you computer via the USB cable.
2. If you have properly enabled your Blackberry as a Mass Storage Device, your Blackberry's microSD card will show as a removable drive on your computer.
3. Double click on the Blackberry folder.
4. Double click on the music folder.
5. Copy your music files to your BlackBerry.
6. Disconnect your Blackberry from the USB cable and go to the "Multimedia" icon on you Blackberry. You need to disconnect when you use the Mass Storage device method as it disables direct access from the BlackBerry when connected to the PC via the USB cable.
7. Click on the Music icon.
8. Click on the Media Card folder.
9. Select your Music folder.
10. Select your Song.
11. Play and enjoy.

Done.

Monday, December 01, 2008

How to transfer Napster music playlist to iTunes playlist for iPod

Music purchased from Napster is under DRM protection, which stops customers from playing the downloaded music with other incompatible devices like Apple iPod and Microsoft Zune. If you don't continue to pay, you won't keep the music when the subscription expires. As we all know, iPod is one of the most popular and successful MP3 players. iPod owners can purchase various music songs from iTunes Store and listen to them with their iPods. However, if you prefer Napster and find some songs in Napster that are unavailable in iTunes store, yet you do want to enjoy these songs witn your new iPod, you are meeting the headache of Naspter being incompatible with iPod. So the following tutorial should be the solution.

The tools you will need:

TuneClone Audio Converter
Napster Software
iPod
iTunes Library

1. Make settings in TuneClone Audio Converter

Download TuneClone (fully compatible with Windows XP and Windows Vista) from http://www.tuneclone.com/index.php and install it. After launching TuneClone, click the "Settings" button. In the pop-up dialog of "Options", you can specify the "Output Folder", "Output Filenames", "Output Format" (here we choose MP3), etc. for the output files.

Tip: You can get the output protection removed MP3 music folder by clicking the "Folder" button after the whole process.

TuneClone to convert DRM protected Napster music to iTunes MP3 for iPod

2. Create a new playlist in Napster

Under "My Playlist", click the "New Playlist" button to create a new playlist. Drag and drop to the playlist the music you are going to burn from your Napster Library.

Transfer Napster playlist to iPod

3. Make CD burning settings in Napster

Click "Tools", and select "Preference..." from the drop-down list. In the left panel of "Options", navigate to "CD Options". In the right panel of "CD Options", choose TuneClone virtual CD drive as the preferred CD burner.

TuneClone to remove DRM and convert Napster music to iPod

Note: Please tick "Burn CD Text" to preserve the metadata of the music.

4. Start to burn

Click the "Burn Disk" button to start the burning and encoding process.

After the burning gets started, TuneClone will automatically convert the music file to MP3. You can open the manager screen to show all the converted music files.

TuneClone to remove Napster DRM for iPod

The most important step is to choose the CD burner. Then the software can convert the music files automatically. It is exceedingly easy when you want to batch convert lots of files.

After you get the output MP3 files converted from the Napster music playlist in your Napster, you can now begin to transfer the MP3 files to your iPod with the sync of iTunes.

Monday, August 18, 2008

How to transfer iTunes M4P to PSP

It is no doubt PSP is a great game player. But it is also a very good entertainment device which can be used for playing music. Assume you have some songs on your iTunes and are trying to figure out how to put them on your PSP. You copy and paste them in the PSP music folder, however, the PSP doesn't recognize the songs as music at all. So what's wrong? Don't worry! This guide will help you out of the trouble.

The music downloaded from iTunes is under DRM protection. In order to play it on your PSP, you need to strip the DRM off and have the iTunes M4P M4A converted to PSP MP3 format. You can burn the protected M4P music files to CD-R or CD-RW disc to make an audio CD and then use some CD ripper software to convert the audio CD track back to PSP MP3. Also iTunes allows you to burn the protected music files to CD-R or CD-RW disc to make a standard audio CD:

1. Insert a CD-R or CD-RW disc into your CD-ROM drive. You'd better use CD-RW disc as it can be used for more than once.
2. Create a new playlist in iTunes. Add the protected songs to your playlist until you have 72 minutes of music. Click Edit and select Preferences. Select the Advanced tab. Tick the Audio CD option on the Burning tab. Click the Burn Disc button to make an audio CD.
Note: You cannot select the MP3 CD option since it requires the protected music files be converted to unprotected MP3 files.
3. After the audio CD is successfully burned, insert the disc into your CD-ROM drive again. Then you can use iTunes or Windows Media Player to import the music tracks on the burned disc to MP3 files.

Convert iTunes to PSP

Sounds a good idea! But it would be a time consuming process if you have a library of iTunes M4P music files ready to be converted to PSP MP3 for playback on your PSP. And it is a waste of CD discs. Moreover, the information about the M4P music files like title, artist and album will be lost after burning and ripping back to MP3 or WMA files. So this method is not recommended if you have a big collection of iTunes M4P music files ready to be transferred to your PSP.

Here, I would recommend using TuneClone M4P to MP3 Converter to convert iTunes M4P to PSP MP3. It applys the virtual CD burning technology to simulates the burning and ripping process. You just need to burn the iTunes M4P playlist to TuneClone virtual CD burner. Then TuneClone will directly convert the iTunes M4P music list to PSP MP3 for you. It is very fast and the information about each music song will be preserved perfectly. You can follow its the step by step tutorial to learn how to convert iTunes DRM protected M4P music to MP3 for PSP.

Convert iTunes M4P to MP3 for PSP

After getting the output MP3 files by adopting either the burn-and-rip method or the way of using TuneClone M4P to MP3 Converter, now you can begin to transfer the MP3 files to your PSP:

1) Connect the PSP to your PC with a USB cable.
2) Press the "home" button on the PSP (it's a tiny button to the lower left of the screen) then use the left-right directional buttons to find "Settings", then the up-down buttons to find "USB Connection" on the PSP.
3) Press the "X" button (you got it, the round button with the "X" on it) and your PSP should display "USB Connection".
4) In a moment or two your computer should tell you that a new USB device has been connected, then show you a new generic hard drive, usually E: or F:
5) Click on the drive letter that corresponds to the PSP unit.
6) Now create a new folder on that drive and name it "psp".
7) Within the new "psp" folder create another folder, and name it "music".
8) Copy your desired mp3 files into the new "music" folder.
9) When you're done copying your desired music tracks, press the "O" button on the PSP to get out of USB connect mode.

Now you're ready to go! Use the left-right arrows to move to the music area, then the up-down arrows to find "Memory Stick". Choose that folder by pressing the "X" button again, and you should be able to find all your favorite music!