Showing posts with label windows media player. Show all posts

Wednesday, June 10, 2009

Put iTunes M4P onto Windows Media Player

The following tutorial will show you how to remove DRM from iTunes protected AAC (M4P) music and convert M4P to (DRM free) WMA/MP3 so as to put iTunes M4P music onto Windows Media Player for syncing to a lot more mobile players.

Why Put iTunes M4P music onto Windows Media Player?

When you purchase music from iTunes Store, you actually get DRM protected content (in protected AAC or M4P format), which you will not be able to play on MP3/MP4 players and other non-Apple mobile players. You cannot directly transfer the M4P files to Windows Media Player, either. In such case, the option is to burn those tracks to an audio CD and then rip them (with iTunes or Windows Media Player) once again to your computer hard drive wherein the DRM will be removed and you will get the tracks in (DRM free) MP3 or WMA format. After this you will be able to transfer them to Windows Media Player.

In case you have purchased a great amount of music from iTunes Store, you can go ahead and use TuneClone M4P to MP3 Converter which acts as a Virtual CD-ROM drive on your PC and lets you remove the DRM element without having to waste actual CD's, with the music ID3 tags info well preserved.

Step by Step: Burn and Rip iTunes M4P Music for Windows Media Player?

1. Insert a CD-R or CD-RW disc into your CD-ROM drive.
2. Burn the iTunes M4P playlist to make an audio CD. You cannot select the "MP3 CD" option since it requires the DRM protected iTunes M4P files be converted to MP3 or WMA files for Windows Media Player.
3. After the audio CD is successfully burned, insert the disc into your CD-ROM drive again. Then you can use iTunes or Windows Media Player to import the music tracks on the burned disc as MP3 or WMA files.

Step by Step: Convert iTunes M4P Music for Windows Media Player with TuneClone

1. Create a new playlist in iTunes.

2. Add the M4P songs to the playlist.

3. Launch TuneClone M4P to MP3 Converter. Click the "Settings" tab. In the pop-up window, you can specify output folder, output file name format, output format (choose MP3 or WMA), etc for the output files. Note: You can check whether TuneClone virtual CD drive is successfully installed and where it is installed in the bottom left corner of the interface.

put itunes m4p music to windows media player

4. Switch to iTunes. In iTunes, click the "Burn Disc" button.

5. In the pop-up window of "Burn Settings", select "TuneClon Virtual_CD-RW" from the "CD Burner" drop-down list, click the radio button next to "Audio CD" and tick "Include CD Text" option. Click "Burn" to start burning.

put itunes m4p music to windows media player

6. Upon the completion of burning the disc and encoding the music, you can open the TuneClone manager screen to show all the converted music files. To locate the output folder, simply click the "Folder" tab on the interface.

Tuesday, October 14, 2008

How to convert protected WMA to MP3 for iPod

"The majority of my albums are in my Windows Media Player and I would like to transfer those albums to my iPod. Now I don't know how to. All I know is that WMA is not compatible with Apple iPod. So how do I rescue my songs? I tried to use limewire to download free music but it is a mess."
If you meet the same problem, you got the right place! The following tutorial details how to put both protected and unprotected WMA (Windows Media Audio) music files to iPod.

If the WMA files you are going to play on your iPod is unprotected, you just select and drag them into iTunes Library and they should be automatically converted to whatever iPod format you selected in iTunes preferences for importing.

If they are WMA files protected by DRM, it is not that easy. You need to use some software to strip the DRM off your WMA files and then convert the WMA files to the much more widely-supported MP3 format.
Note: As with any transcoding, the quality will go down. But if you've got a lot of protected WMA files you'd like to get on your iPod, this solution would do the trick.

In this tutorial, I'd like to show how to remove DRM from WMA files and convert the WMA files to MP3 format using TuneClone Audio Converter. Let’s take a look at how it performs:

1. Settings at TuneClone

Convert WMA to iPod with TuneClone

Download TuneClone (fully compatible with Windows XP and Windows Vista) and install it. After launching TuneClone, click the Settings button. In the pop-up dialog of Options, you can specify the Output Folder, Output Filenames, Output Format (here we choose MP3), etc. for the output files.
Tip: You can get the output protection removed MP3 music folder by clicking the Folder button after the whole process.

2. Burning at Windows Media Player(WMP 11)

Create a new playlist and drag into it the WMA files you are going to enjoy on your iPod. After that, click the Burn button and select Audio CD from the drop-down list. On the right panel of CD Drive, click Next Drive to locate the CD drive to TuneClone's Virtual CD Burner.

Convert WMA to MP3 for Apple iPod

Note: If you are unsure whether TuneClone's Virtual CD burner is successfully installed or where it is installed, please refer to the bottom left corner of TuneClone:

Convert WMA to MP3 for iPod nano, iPod touch, iPod classic

Then, drag the playlist you created just now to the Burn List and click the Start Burn button to start burning the playlist. While the burning gets started, TuneClone will automatically convert the WMA playlist to MP3 files. You can open the manager screen to show all the converted music files.
Note: If you get the output files formatted as 01-1.mp3, 01-2.mp3, etc., please click the output MP3 songs in the manager screen and drag the counterpart original WMA songs to the Track Info panel of TuneClone one by one. The information about the artist, album, title, etc. will be changed accordingly. It would be a time-consuming process if you are burning a big collection of music. However, since Windows Media Player 11 doesn't support CD-text burning, this seems to be the only way to get the information back.

WMA to iPod touch, iPod nano, iPod classic

After you get the output MP3 files converted from the WMA playlist in your Windows Media Player, you can now begin to transfer the MP3 files to your iPod with the sync of iTunes.

Thursday, July 17, 2008

How to convert protected WMA to MP3 with TuneClone

TuneClone Audio Converter is a unique audio converter program. Compared with other audio converter programs, TuneClone converts music files via a virtual CD driver. All you need to do is burn your playlist to TuneClone's virtual CD drive by using your media player software, such as iTunes, Windows Media Player, RealPlayer, WinAMP, etc. The key step to use TuneClone is to select TuneClone's virtual CD-RW drive as CD burner and then burn your playlist. Your music files will be automatically converted during the burning and ripping process.

In my previous post, I talked about how to burn DRM protected iTunes M4P music to MP3 by using iTunes. Today, with the help of the same program TuneClone, I'd like to elaborate on how to convert protected WMA to MP3 using TuneClone's virtual CD drive. Below are the detailed steps:

1. Download TuneClone from http://www.tuneclone.com/tuneclone_setup.exe and install it.

TuneClone is fully compatible with Windows XP and Windows Vista. A virtual CD burner will be installed. This virtual CD-RW will be used to convert music files.

2. Set "Burn" option at Windows Media Player

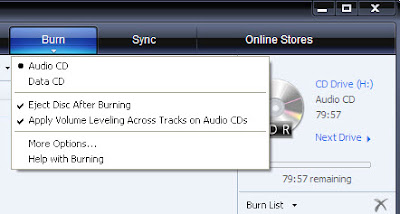
Launch Windows Media Player and click the "Burn" button in the main window to enable the burning function of Windows Media Player. From the drop-down list, please tick "Audio CD" option if it is currently unchecked.

convert protected WMA to MP3 with TuneClone

3. Select the TuneClone's Virtual CD burner

Click the "Next Drive" button to select TuneClone's Virtual CD Burner.

4. Start to burn

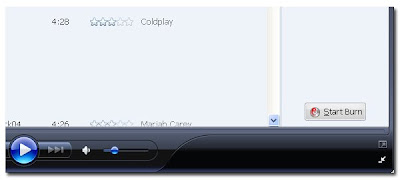
Drag your music files to the "Burn List", and click the "Start Burn" button to burn the playlist.

convert protected WMA to MP3

After the burning gets started, TuneClone will automatically convert the music file to MP3. You can open the manager screen to show all the converted music files.

convert protected WMA to MP3 using TuneClone

The most important step is to choose the cd burner. Then the software can convert the music files automatically. It is exceedingly easy when you want to batch convert lots of files.

Note: Under Windows Vista, Windows Media Player 11 may not able to choose the TuneClone's virtual CD burner.